
In brief: A potato tower uses vertical space instead of a large garden bed. Plant pre-sprouted seed potatoes in a loose, nutrient-rich layer of soil, gradually add more soil as they grow, and keep it evenly moist. A sunny spot, suitable varieties and good drainage are key to healthy plants and a worthwhile harvest.
Direct answer: A potato tower uses vertical space instead of a large garden bed. Plant pre-sprouted seed potatoes in a loose, nutrient-rich layer of soil, gradually add more soil as they grow, and keep it evenly moist. A sunny spot, suitable varieties and good drainage are key to healthy plants and a worthwhile harvest.
A potato tower makes it possible to grow potatoes in a small space. Instead of setting aside several square feet for a garden bed, you grow the plants in a tall container. This works well on patios, in courtyards and small gardens, and in many urban gardening setups.
The idea is simple: plant potatoes in a shallow layer of soil, let the shoots grow, then gradually add more soil. The plant forms tubers on underground runners called stolons. The added soil gives them more room, but it does not automatically guarantee a larger harvest.
How does a potato tower work?
A potato tower grows plants vertically. The seed potatoes start in the bottom layer. Once the green shoots are about 15 to 20 cm above the soil, cover the lower part of each shoot with more soil. Leave only the shoot tips visible.
This process, called hilling, creates additional areas along the covered stem where the plant can form stolons. It works best with healthy, vigorous plants and loose soil. Some varieties respond much better to gradual hilling than others.
What does the potato plant actually produce?
Potatoes do not form on every section of stem buried at any depth. The variety, seed potato, temperature, water supply and available space all affect the yield. A tower mainly saves space and makes harvesting easier. It does not guarantee a high yield.
Set up the tower so the plants get enough light and the soil does not stay wet all the time. An overly tall, dense structure is harder to care for. For beginners, two to three soil-filling stages are enough.
- Height: You use the space above ground and need less room for a garden bed.
- Loose soil: Stolons and tubers develop better in a well-aerated growing medium.
- Even moisture: The soil should not dry out, but it should not become waterlogged either.
- Good light: Potatoes need a bright, preferably sunny spot.
Pro tip
Mark the height of the next soil layer on the container. This makes it easier to cover the shoots evenly each time and helps you avoid filling the tower too early or too high.
Which location and materials are suitable?
Choose a spot that gets at least six hours of sun a day. A place beside a warm exterior wall can speed up growth, but make sure the container does not get so hot that it dries out. A spot sheltered from the wind is helpful because tall potato shoots can bend easily when wet.
Weight matters on a balcony or rooftop patio, too. A filled container with moist soil, plants and water can be much heavier than an empty one. Put the potato tower on a stable surface and check your balcony's weight limit.
Pot, sack or homemade tower?
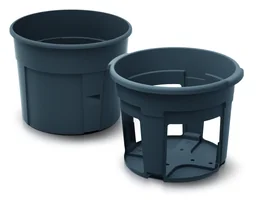
A sturdy growing pot is the easiest option for your first potato tower. It is less likely to tip over, keeps the soil in place and can be emptied at the end of the season. For small spaces, , a potato growing pot with a diameter of 392 mm, is a good fit.
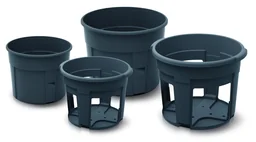
If space is limited, with a diameter of 295 mm is a suitable choice. Plant fewer seed potatoes in it, and do not crowd the pot with too many shoots. More plants do not automatically mean more tubers; they often just compete more for water and nutrients.
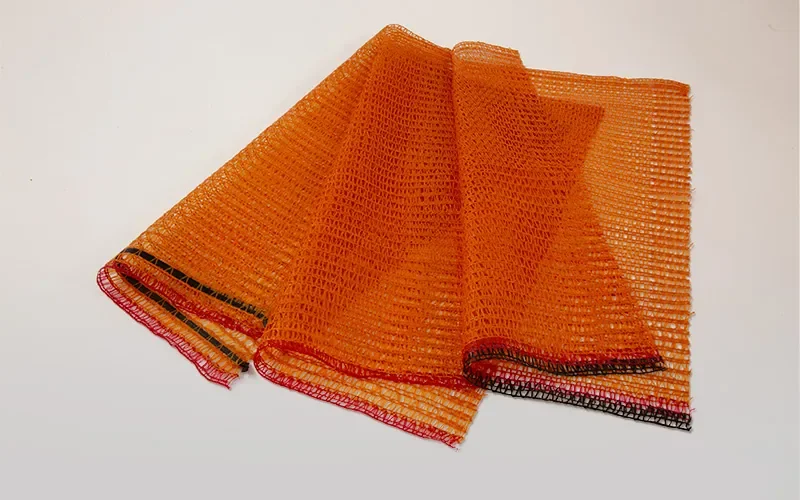
A potato sack can also work if it is stable and excess water can drain away. Use mainly for harvesting and transporting potatoes. A mesh sack without a drawstring is not a substitute for a stable growing container with good drainage.
What soil does a potato tower need?
Use loose vegetable or potting mix. For example, combine two parts of high-quality potting mix with one part of mature compost. The mix should provide nutrients without becoming sticky. Pure compost is too rich in nutrients and can hold water unevenly.
Heavy, clay-rich garden soil compacts quickly in a container. It restricts root growth, holds too much water and makes harvesting harder. If needed, add a structurally stable material such as well-rotted compost, but avoid fresh manure and coarse pieces of wood near the tubers.
You can find suitable accessories in the Garden and Plant Accessories category. For seed potatoes and other vegetables, browse the Vegetables category as well.
“Potatoes need a sunny spot and loose, humus-rich soil.”
How do you build a potato tower step by step?
Setting it up requires no complicated construction. The key factors are a suitable container, healthy seed potatoes, a loose growing mix, and a regular routine of watering and adding more soil.
1. Prepare the container
Clean the pot before planting. Check that the container has several unobstructed drainage holes. Waterlogging quickly causes potato tubers to rot and roots to weaken.
Place the pot on feet or a permeable surface so water can drain away freely. A thick layer of gravel does not replace a drainage hole and only takes up valuable root space. At most, place a coarse, air-permeable material over very large holes to prevent soil from washing out.
2. Add the first layer of soil and plant the seed potatoes
First, add around 15 to 20 centimeters of soil. Place the pre-sprouted seed potatoes on the surface with the eyes facing up. A container with a diameter of around 392 millimeters usually holds three to five tubers. In a smaller pot with a diameter of about 295 millimeters, plant one or two tubers.
Cover the potatoes with around eight to ten centimeters of soil and water carefully. The soil should be evenly moist, but not dripping wet. Use certified seed potatoes whenever possible. Potatoes from the grocery store may have been treated with sprout inhibitors or may carry diseases.
3. Add more soil after the shoots emerge
Wait until the shoots are 15 to 20 centimeters tall. Then add enough soil to cover around two-thirds of the lower stems. Leave five to ten centimeters of the green shoot tips exposed.
Repeat this process as soon as the shoots have clearly grown out again. Two to three additions of soil are normally sufficient. Work carefully so you do not damage young roots and shoots.
Do not fill the soil right up to the rim. Leave enough space at the top for water and a final loose layer. An overfilled surface will overflow when watered and carry nutrients out of the container.
4. Complete the tower
When the plant is growing strongly and the container is sufficiently filled, allow the shoots to continue growing. Do not keep adding soil indefinitely. A column that is too tall dries out quickly at the top, while the lower area remains wet.
If necessary, cover the surface with a thin layer of mature compost. Apply organic fertilizer only according to the manufacturer's instructions. Too much nitrogen produces plenty of foliage, but not necessarily more potatoes.
Important note
Never cover the green shoot tips completely, and do not keep a potato tower permanently wet. The plant needs light to produce leaves. Standing water encourages rot, fungal diseases, and a musty smell from the container.
How do you care for and harvest potatoes in a tower?
After the final addition of soil, care determines the harvest. Check the moisture regularly with your finger. When the top two to three centimeters are dry, water slowly and thoroughly until some water runs out of the drainage holes.
Containers need water more frequently than garden beds in hot weather. Black or dark-colored pots heat up particularly strongly in the sun. Water preferably in the morning and, on hot days, check again in the evening to see whether the surface has dried out.
Water and fertilize correctly
A good basic mix containing mature compost is sufficient to get started. After a few weeks, you can use an organic potato or vegetable fertilizer according to the instructions on the packaging. Do not fertilize dry soil; water lightly first if necessary, then carefully work in the fertilizer.
The Fertilizer category offers suitable products for feeding plants in the garden. For an even water supply, you can find accessories in the Garden irrigation category. Use fertilizer sparingly, as excess salts can damage roots in the limited space of the container.
Check the leaves and identify diseases
Healthy potato foliage is a strong green. Yellow leaves at the end of the season are normal. However, if dark spots, curled leaves, or a rotten smell appear early on, check the plant and the moisture level.
Do not put diseased foliage on the compost heap. After harvesting, empty a badly affected pot completely and do not immediately reuse the old soil for potatoes. Clean the container before the next season.
When is the right time to harvest?
You can harvest new potatoes as soon as the tubers have reached the desired size. To do this, carefully dig down at the side or reach into the top layer with your hand. This allows you to harvest individual tubers without removing the entire plant.
For potatoes intended for storage, wait until the foliage has completely yellowed and died back. Then leave the tubers to mature in the container for around two to three weeks. The skins will become firmer and protect the potatoes during storage.
Empty the pot onto a tarp or into a crate. This also helps you find small tubers, after which you can roughly clear the soil of roots and plant remains. is suitable for collecting and transporting the harvest.
Store undamaged potatoes in a dark, dry, cool, frost-free place. Do not wash potatoes intended for storage immediately after harvesting. Brush off adhering soil only once the tubers have dried completely.
“Potatoes can also be successfully grown in small spaces and in containers.”
Which mistakes reduce yields?
A potato tower can handle some variation, but a few mistakes are common. Most problems come from overcrowding, compacted soil or inconsistent watering.
Planting too many seed potatoes
A full pot may look promising at first. In reality, the plants compete for light, water and nutrients. The shoots stay thin, the soil dries out unevenly and the tubers remain small.
Use the container's diameter as a guide. A larger pot can hold three to five tubers, while a smaller one should have just one or two plants.
Using soil that is too heavy or wet
Once compacted soil is covered with more soil, it is difficult to loosen. The roots get little oxygen, water can collect and the tubers may rot. Use a loose potting mix and check the moisture before watering.
Do not leave the pot in a saucer where water can collect. If the container stays wet for several days after heavy rain, improve the drainage or move it to a more sheltered spot.
Adding too much soil at once
Topping up the soil gradually takes patience. Do not cover the stem up to the rim as soon as the first leaves appear. The plant needs room to keep growing and enough leaf area.
Add a moderate layer at a time and wait for the next growth spurt. This keeps the tower stable and makes it easier to monitor the plant's progress.
Choosing the wrong location
In the shade, potato plants grow tall and weak. On a hot, windy rooftop patio, the container can dry out quickly. Choose a bright spot sheltered from strong winds, and water the plant regularly.
For more gardening supplies, browse the garden equipment category. Accessories for garden beds, containers and small growing spaces make plant care easier, but they cannot make up for a poor location.
Set realistic expectations for a potato tower
A potato tower is especially useful if you have limited garden bed space or want to grow vegetables on a patio or balcony. It makes emptying the container easier and lets you see how the plants develop. A large harvest still depends on the variety, seed potatoes, sunlight, water and temperature.
If you grow potatoes every year, replace the growing mix or reuse it for other plants afterward. Potatoes need plenty of nutrients. Rotating crops reduces the risk of diseases and pests building up in the soil.
Start with one container, observe the plant and record the planting date, the dates you add soil and the harvest date. This will help you see which variety and location work best in your garden next year.
Additional tip
Use a potato tower to supplement your vegetable garden. Do not grow all your potatoes in a single container. With two pots of different sizes, you can extend the harvest season and compare varieties, watering amounts and locations side by side.
To get started, all you need is a sunny spot, a sturdy container, good seed potatoes and loose soil. Add soil to the tower gradually, keep the moisture consistent and harvest at the right time. This makes it easy to grow potatoes reliably in a small space.
Frequently asked questions
- How many potatoes should I plant in a potato tower?
- A potato tower with a diameter of around 392 millimetres can usually hold three to five seed potatoes. A smaller pot with a diameter of about 295 millimetres can hold one or two tubers. Leave enough space between the potatoes so each plant gets light, water and nutrients.
- How often should I add soil to potatoes in a tower?
- Add more soil when the shoots are about 15 to 20 centimetres tall. Cover only the lower part of the plant each time, leaving the shoot tips exposed. Repeat this two or three times. Covering the shoots completely slows growth and increases the risk of rot.
- What type of soil is best for growing potatoes in pots?
- Potatoes grow best in loose, humus-rich, well-draining potting mix. Mix high-quality potting soil with mature compost, but do not use pure compost. Heavy garden soil can quickly become compacted in a container. A good mix retains moisture, drains excess water and stays well aerated.
- When can I harvest potatoes from a potato tower?
- Depending on the variety, early potatoes may be ready to harvest about 60 to 90 days after planting. For potatoes you plan to store, wait until the foliage has completely yellowed and died back. Then leave the tubers in the soil for another two to three weeks so their skins can toughen.
- Can I set up a potato tower on a balcony?
- A potato tower works on a balcony if the spot gets at least six hours of sunlight and the surface can safely support its weight. Wet soil is heavy. Check your balcony's weight limit, secure the pot and make sure water can drain freely.
You may also be interested in
- Planting and harvesting potatoes: The path to success
- Chitting potatoes: How to get a plentiful harvest
- Growing early potatoes: An easy harvest in a burlap sack
- Growing sprouts at home: An easy way to grow healthy sprouts in a sprouting tower
- Potato varieties: The best choices for your home garden
- Build your own raised garden bed with a door: Step-by-step instructions