
In brief: A stable base for a stone patio requires excavation to a depth of 30-40 cm with a 2% gradient. This is followed by a 20-25 cm thick, compacted frost protection layer made from crushed stone. A thinner sub-base layer of finer crushed stone levels the area. The top layer is a 3-5 cm high, uncompacted bedding layer of decorative chippings, into which the stones are laid.
A stone patio is the perfect place to enjoy relaxed summer days. But its beauty and durability depend on what you cannot see: the base beneath it. An incorrectly constructed sub-base inevitably leads to problems such as sunken slabs, unsightly puddles and rampant weeds. With the right preparation, you can create a solid foundation that will provide enjoyment for decades.
This guide takes you through every crucial step, from planning and excavation to the correct layer structure. This is how to create a professional base for your dream patio.
Why is the right base so important for a stone patio?
The sub-base is the foundation of your patio. It performs several critical functions at the same time. Its main purpose is to distribute the weight of the paving slabs and the loads placed on them later, such as garden furniture and people, evenly across the ground beneath. Without this load distribution, individual slabs would give way under pressure and sink.
A correctly constructed sub-base also ensures effective drainage. Water that seeps through the joints must be able to drain away. If moisture collects in the ground beneath, it can freeze in winter. Freezing water expands and pushes the slabs upwards. This effect, known as frost heave, destroys the level surface and can even cause slabs to crack. A properly constructed frost protection layer reliably prevents this.
A stable base also prevents weeds from growing up from below. The compacted layers of crushed stone and chippings form a barrier that is impenetrable to most roots. This significantly reduces the maintenance required later.
Planning: The foundation of your patio project
Every successful building project starts with careful planning. Take time to decide on the details before breaking ground. This will save you costly corrections and unnecessary work later.
Choose the location, size and shape
Think carefully about where you want your patio to be. Consider the amount of sunlight at different times of day, protection from wind and prying eyes, and access from the house. Mark out the planned area with wooden stakes and builder's line. This will give you a feel for the dimensions and allow you to assess how it looks in its setting. Walk over the area and place a table and chairs there temporarily.
Carefully compacting the base is the be-all and end-all for a paving surface that remains level and stable over the long term. Every shortcut taken here will come back to haunt you twice over and lead to unsightly settlement later.
Choosing the right materials for the base
You will need different aggregates for the base. Each layer serves a specific purpose:
- Frost protection layer: Use crushed stone or mineral aggregate with a grading of 0/32 mm or 0/45 mm. This material compacts very well and is permeable to water.
- Sub-base layer: The frost protection layer often also serves as the sub-base. With very high loads or difficult ground conditions, an additional sub-base layer made from finer crushed stone, such as 0/32 mm, may be advisable to create an even more level foundation.
- Bedding layer: The top layer directly beneath the stones consists of decorative chippings with a grading of 2/5 mm or 1/3 mm. The angular stones interlock and hold the slabs in place. Do not use sand, as it attracts ants and can turn fluid when wet.
Tools and machinery for building a patio
Make sure you have all the tools you need close at hand. Basic equipment includes a shovel, spade, wheelbarrow, tape measure, spirit level and builder's line. For accurately screeding the bedding layer, sturdy metal pipes or special screed rails and a long aluminium straightedge are essential. The most important machine for building a patio is the plate compactor. It is indispensable for compacting the crushed stone layers and can be hired from most DIY stores. You can also find suitable garden tools in our range.

Step-by-step guide: How do I build the base for a patio?
Once the planning is complete, it is time to put your plans into practice. Work precisely and allow enough time for each step. The quality of the sub-base determines how long your patio will last.
Step 1: Mark out and excavate the area
The marked-out area must now be excavated, also known as digging out. The excavation depth depends on the planned build-up height. Add together the thickness of your patio slabs, the height of the bedding layer (3-5 cm) and the thickness of the compacted sub-base (approx. 20-25 cm). For a patio subject to normal loads, this results in an excavation depth of around 30-40 cm.
When excavating, make sure you allow for the necessary 2 % slope away from the house. This means the ground should fall by 2 cm per metre. Set up your guide strings with the appropriate slope. Check the depth and gradient regularly while excavating using a spirit level and a folding rule.
Important note
The 2 % slope must consistently run away from the house. Check it again in every layer of the sub-base using a long spirit level or straightedge. Standing water against the house wall can cause serious damp damage to the masonry.
Step 2: Add and compact the frost protection layer
Now add the first layer of the sub-base: the frost protection layer. Use crushed stone for this, such as 0/45 mm. Add the material in layers no more than 10-15 cm thick. Each layer must be carefully compacted with a plate compactor. Run the compactor several times lengthways and crossways over the entire area until the material no longer settles.
Compaction causes the layer to settle by around 10-20 %. Take this into account when calculating the amount of material required. Only add the next layer once the previous one has been fully compacted. This ensures consistently high stability throughout the base.
Step 3: Create a stable sub-base
The sub-base forms the top layer of the crushed stone foundation. It provides a clean, level base for the bedding layer. The same material, or a slightly finer grade than that used for the frost protection layer, is usually used here. This layer must also be carefully compacted after it has been added. The 2 % slope must be maintained precisely. This is your last opportunity to correct any major unevenness.
Pro tip
For a perfectly level bedding layer, place two metal pipes, such as electrical conduit, parallel to each other at the correct spacing and with the correct slope in the grit. Fill the space between them with grit, then use a straightedge to level it off across the pipes. This gives you an absolutely flat surface.
Step 4: Create the grit bedding layer
Spread a bedding layer of fine crushed stone, such as 2/5 mm, over the compacted sub-base. Level off a layer 3 to 5 cm thick. Use screed rails and a straightedge for this. Unlike the previous layers, this grit layer should not be compacted. The patio slabs will be laid directly into this loose bedding layer and tapped into place afterwards. This makes it easy to compensate for minor differences in slab height.
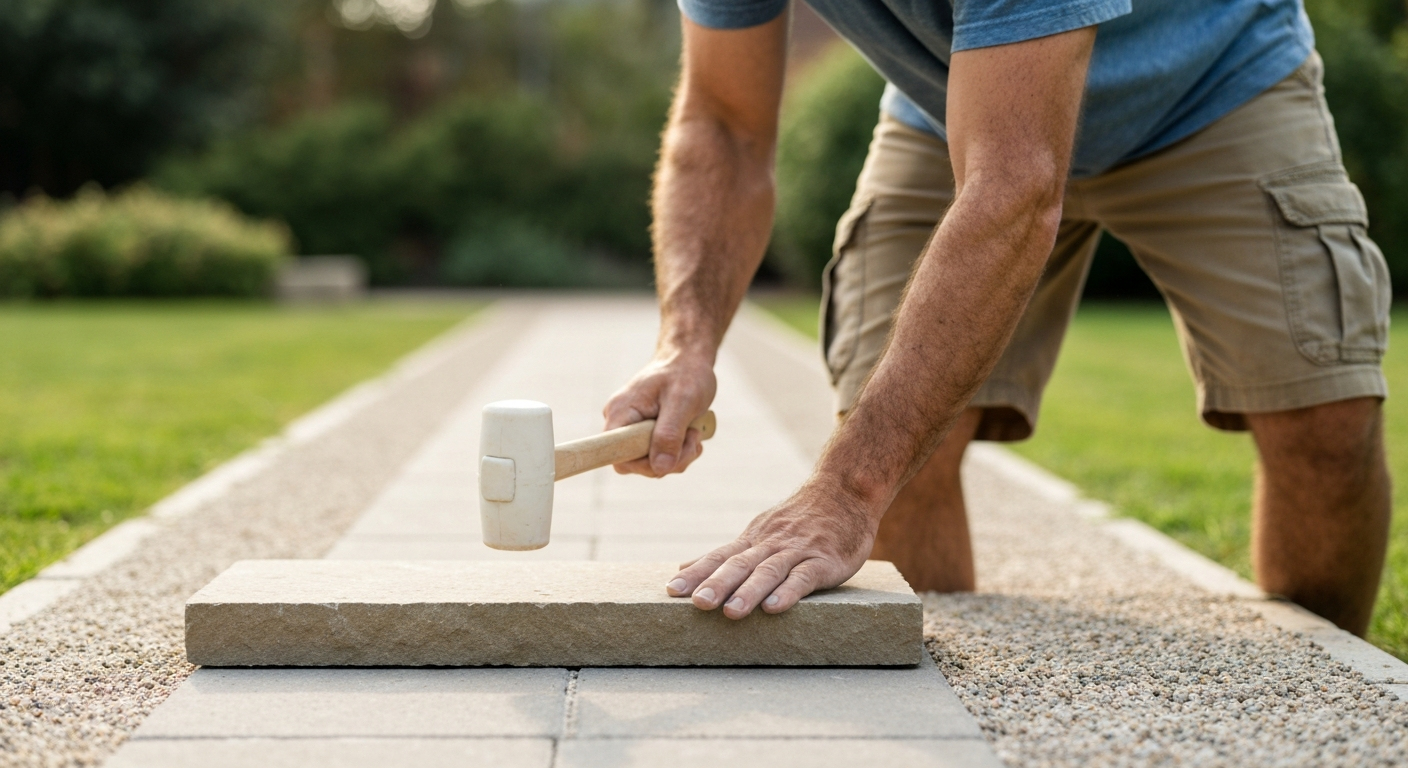
Laying the patio slabs: precision is essential
Start laying the slabs in one corner, ideally against the house wall. Work outwards from there so you do not have to walk on the freshly levelled grit bed. Lay the first row precisely along a taut string line.
Use tile spacers or small wooden wedges to maintain an even joint width of 3-5 mm. Tap each slab gently into the grit with a rubber mallet until it is at the correct height and no longer rocks. A suitable
Laying the stones is the finishing touch. But attention to detail, from the joint width to making a clean cut, is what separates good work from a truly professional finish.
The final steps: jointing and cleaning
Once all the slabs have been laid, it is time for the finishing work. Filling the joints stabilises the slabs and gives the surface its final finish.
Choosing the right jointing material
Depending on your preferences and requirements, you can use different materials:
- Jointing grit: Fine crushed stone, such as 1/3 mm, is permeable and easy to work with.
- Jointing sand: Traditional quartz sand is inexpensive, but it can encourage weeds and ants.
- Jointing mortar: Resin-bound mortars are strong, permeable and reliably prevent weed growth. However, they are more time-consuming to apply.
Additional advice
Choose a jointing material colour that complements your patio slabs. Light-coloured jointing sand with dark slabs, or vice versa, can create an attractive pattern. With unbound joints made from sand or grit, you should expect to refill them every few years.
Sweeping in and compacting
Spread the dry jointing material over the patio and sweep it diagonally into the joints with a soft broom. With robust concrete slabs, you can then carefully compact the surface using a plate compactor fitted with a protective rubber mat. This drives the jointing material deep into the joints and sets the slabs firmly in their final position. Do not compact delicate natural stone or ceramic slabs; simply tap them firmly into place with the rubber mallet.
After compacting, sweep in more jointing material until all the joints are completely full. Sweep away any excess material. Finally, clean the new patio thoroughly. A powerful helper such as the
effortlessly removes building dirt and residual jointing sand.
A well-planned and carefully constructed sub-base is the key to a beautiful, long-lasting stone patio. With the right materials and tools from our Garden + Outdoor range, your project is sure to be a success. Explore our wide selection of garden equipment to complete your new outdoor retreat.
Frequently Asked Questions
- How deep do I need to excavate for a patio?
- For a patio intended for foot traffic, excavate the ground to a depth of around 30 to 40 cm. This provides enough space for a 20-25 cm thick frost protection and sub-base layer, a 3-5 cm paving bed and the height of your patio stones. In clay soils or frost-prone regions, deeper excavation may be advisable.
- What slope does a patio need?
- A stone patio needs a gradient of at least 1.5% to 2%. This means the surface should fall by 1.5 to 2 cm per metre of length. The gradient must always lead away from the house so that rainwater can drain safely and moisture damage to the building structure is prevented.
- Why should you use gravel chippings instead of sand for the paving bed?
- Gravel chippings have angular edges and lock together, creating a more stable base for the paving stones. They also provide better drainage and help prevent weed growth. Ants, on the other hand, readily use sand as a nesting site, which can undermine the joints and the stability of the stones.
- Can I build a patio without a plate compactor?
- Building without a plate compactor is not recommended. Mechanical compaction of the frost protection and sub-base layers is essential for the patio's stability and longevity. Manual tamping can never achieve the required density, which later leads to uneven surfaces and sunken stones. You can hire a plate compactor from a DIY store.
- What material is suitable for a frost protection layer?
- A graded aggregate with a particle size of 0/32 mm or 0/45 mm is best suited to a frost protection layer, for example crushed stone, mineral concrete or a gravel-sand mix. This material allows water to drain away easily, preventing it from collecting beneath the patio, freezing and lifting the stones.
You may also be interested in
- Wooden deck substructure: Build it sturdy and easily
- Laying a stone patio: Step-by-step guide for DIY enthusiasts
- Wooden deck vs stone patio: Comparison and decision-making guide
- Laying stone slabs: Step-by-step guide for patios & paths
- Laying patio tiles: Your route to the patio of your dreams
- Cladding your patio with decking boards: How to build your new wooden deck