
In brief: Building your own bathroom shelf is a cost-effective way to create storage tailored to your space. Choose moisture-resistant materials such as sealed wood or metal, plan the dimensions precisely and draw up a sketch. After cutting the materials and treating the surfaces, assemble the parts and securely attach the shelf to the wall.
Every centimetre counts in the bathroom. Space quickly runs out among towels, toiletries and cleaning products. A custom bathroom shelf solves this problem elegantly and individually. Instead of compromising with standard furniture, you can simply build the perfect solution yourself. You decide on the size, material and design, creating a one-of-a-kind piece that complements your bathroom perfectly.
Why should you build your own bathroom shelf?
Picking up a hammer and screwdriver is worthwhile in more ways than one. A DIY project gives you full control over the end result and offers tangible benefits.
A tailored solution for every niche
Awkward corners, narrow recesses above the toilet or unused space above the door can become valuable storage with a shelf you build yourself. You can adapt the dimensions precisely to your surroundings and make full use of your bathroom's potential. No wasted space, no compromises.
Personalised design to suit your style
Whether you prefer a rustic country look with solid wood, cool industrial chic with metal pipes or minimalist styling with floating shelves, the choice is yours. Select materials and colours that complement your tiles, fittings and the rest of your décor perfectly. This makes your shelf not only practical but also a real eye-catcher.
Control costs and create lasting value
Building furniture yourself can often save money. You have complete control over material costs and can make choices to suit your budget. You also create a durable, sturdy piece of furniture with your own hands, giving it an intrinsic value that cannot be measured in money. The feeling of having created a functional and beautiful object yourself is the best reward.
Wood in the bathroom is not a contradiction; it is a statement of homeliness. The right type of wood and flawless surface sealing are crucial. They not only protect the material but also highlight its natural beauty.
Which materials are suitable for a bathroom shelf?
The bathroom is a humid environment. Steam and splashing water place high demands on the material. Choosing the right material is crucial for the longevity of your shelf.
Solid wood: the classic choice for warmth and natural beauty
Wood brings a warm, cosy atmosphere to the bathroom. Hardwoods such as oak or beech are robust and durable. Less expensive softwoods such as pine or spruce are also suitable, but they require particularly thorough protective treatment. Bamboo is an eco-friendly, naturally moisture-resistant alternative. All wood must be sealed for bathroom use, for example with marine varnish or a special hardwax oil.
MDF and chipboard: the budget-friendly alternative
MDF and chipboard are inexpensive and easy to work with. They provide a smooth surface that is easy to paint. Their main weakness is their susceptibility to moisture. Thoroughly sealing all surfaces and edges with waterproof varnish or paint is essential to prevent them from swelling.
Additional advice
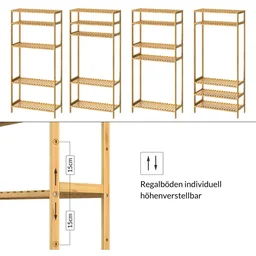
Plan ahead. Consider not only what you want to store now, but also what you might need to add in the future. A slightly deeper or higher shelf can be very useful later. Adjustable shelves offer maximum flexibility.
Metal and glass: modern and easy to maintain
For a modern or industrial look, metals such as stainless steel or powder-coated aluminium are ideal. They are resistant to moisture and very easy to maintain. Combined with shelves made from toughened safety glass (ESG), they create a light and open look that is particularly beneficial in small bathrooms.
Upcycled materials: creative and sustainable
Give old items a new purpose. Old wooden crates, sturdy wine crates or even old ladders can be transformed into unique shelves. Water pipes from a DIY store, combined with wooden boards, can also create trendy industrial-style shelving. There are no limits to your creativity.
How do you plan your DIY bathroom shelf step by step?
Good planning is half the battle. Take the time to prepare your project carefully. This will save you corrections and frustration later.
Needs analysis: what does the shelf need to do?
Define its purpose. Should the shelf hold heavy stacks of towels or only light decorative items and perfume bottles? How high do the compartments need to be for shampoo bottles or toilet rolls? Write down everything you want to store on the shelf so you can plan the spacing and load capacity correctly.
Measure up and draw a sketch
Measure the available space precisely, down to the millimetre. Take light switches, sockets and protruding tiles into account. Create a detailed drawing with all dimensions: height, width, depth and the exact positions of the shelves. A good sketch is your roadmap for the entire build.
Pro tip
For strong, concealed joints, use a pocket-hole jig. With this tool, you drill angled holes in which the screw heads disappear completely. The result looks professional and is extremely strong.
Create a materials and tools list
Use your sketch to create a shopping list. Note the exact number and size of the boards, screws, wall plugs and brackets you need, along with the materials for treating the surfaces (sandpaper, primer, varnish/oil). Also make sure you have all the tools to hand, such as a tape measure, pencil, drill, cordless screwdriver and saw.
The Step-by-Step Guide: How to Build Your New Bathroom Shelf
Now it’s time to put your plan into action. Work carefully and accurately to achieve a perfect result.
Step 1: Cutting the Materials
Ideally, have the boards cut to size at the DIY store. This saves work and ensures precise, clean edges. If you are cutting the boards yourself, use a guide rail for straight cuts. Check all measurements again before moving on to the next step.
Step 2: Treating the Surfaces
This step is crucial in the bathroom. Sand all wooden parts smooth with fine-grit sandpaper to remove splinters and prepare the surface for sealing. Then apply a primer followed by at least two coats of waterproof paint or wood stain. Lightly sand the surface between coats to achieve an especially smooth finish.
Important note
When treating the surfaces, work in a well-ventilated room or outdoors. Paints and stains can release fumes. Wear a dust mask and safety goggles when sanding to protect your health.
Step 3: Assemble the Shelf
Lay out all the parts according to your sketch. Precisely mark the positions of the screws or dowels and pre-drill the holes to prevent the wood from splitting. Join the side panels to the shelves. Apply wood glue to the joints for additional stability before tightening all the screws. Use a set square to check that all corners are at right angles.
Step 4: Wall-Mounting or Setting It Up
For a wall-mounted shelf, secure fastening is essential. Check the condition of your wall. For solid concrete or brick walls, you will need suitable wall plugs. Special hollow-wall anchors are essential for drywall. Level the shelf with a spirit level, mark the drill holes and secure it firmly. A freestanding shelf should stand straight and, if necessary, be secured to the wall with an angle bracket to prevent it from tipping, especially if there are children in the home.
There is a clear trend towards multifunctional and personalised furniture. A handmade shelf is more than just storage – it is an expression of your creativity and turns a functional room such as the bathroom into a personal retreat.
Alternatives to Building Your Own: When You’re Short on Time
A DIY project is a great idea, but sometimes you simply don’t have the time or the right tools. That’s no reason to go without practical storage. There is a wide range of ready-made solutions that combine functionality and design.
For a classic and uncomplicated look, a simple freestanding shelf such as the
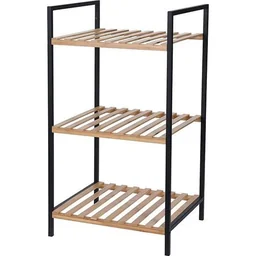
made from white-painted wood is a great choice. It blends discreetly into almost any interior and offers space for essentials across three levels. If you need plenty of storage in a small footprint, tall, narrow shelves are ideal. The height-adjustable bathroom shelf makes the most of the available height and can be adjusted to suit your needs. For specific requirements, such as storing towels neatly, there are well-designed solutions like the towel bathroom shelf , which keeps rolled towels within easy reach and displays them decoratively. These ready-made boards & shelves are an excellent alternative for creating a tidy space quickly and easily.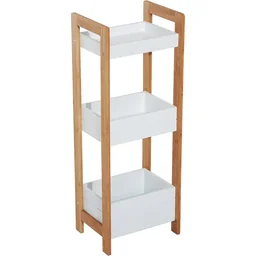
Whether you build it yourself or buy it ready-made, a well-organised shelf can transform your bathroom into a tidy, relaxing retreat. Take on the project and enjoy the results of your work. You’ll see, it’s worth it!
Frequently Asked Questions
- Which type of wood is best for a bathroom shelf?
- Hardwoods such as oak and beech, or tropical woods such as bamboo and teak, are ideal because they are naturally more resistant to moisture. Softwoods such as pine also work, but they require careful sealing with waterproof paint or oil to prevent swelling and mould growth.
- How do I securely attach a heavy bathroom shelf to the wall?
- The fixing method depends on the wall. For solid walls such as concrete or brick, use suitable wall plugs and screws. For drywall, special hollow-wall anchors, toggle bolts or fixings attached to the wooden or metal studs behind the wall are necessary to support the weight safely.
- Do I always need to treat wood for use in the bathroom?
- Yes, untreated wood swells in humid bathroom air and can develop mould. Treatment is essential. Use waterproof wood stains, clear varnishes (boat varnish is ideal), special oils or waxes to seal the pores and protect the wood from moisture and water vapour over the long term.
- How deep should a bathroom shelf be?
- A typical depth for a bathroom shelf is between 15 and 25 cm. This is sufficient for most toiletries, folded towels or decorative items without the shelf protruding too far into the room. Measure your largest items, such as a toilet roll, beforehand.
- Can I use MDF boards for a bathroom shelf?
- Yes, but only if you seal them very carefully. MDF absorbs moisture easily. Prime the board on all sides and apply several coats of waterproof paint. Take particular care to seal the cut edges thoroughly with edge banding or paint.