
In brief: Building a corner shelf yourself is an efficient way to turn awkward, unused corners into valuable storage space. You’ll need basic woodworking tools, suitable materials such as wood panels or metal profiles, and careful planning. Designs range from simple open shelving to rotating units. With accurate measurements and sturdy connections, you can build a custom shelf that fits your space and needs.
DIY Corner Shelf: Make the Most of Unused Space
Corners often go unused. A homemade corner shelf can turn these awkward spots into useful storage. The benefits are clear: you make the most of your space, choose custom dimensions and build a project that develops your DIY skills.
Whether it’s for a garden shed, workshop, living room or kids’ room, a made-to-measure shelf can solve a range of storage problems. Here’s how to get started.
Why build your own corner shelf?
Ready-made corner shelves can be expensive or may not fit a particular nook. With a DIY shelf, you can make use of every inch. Choose the height, depth and number of shelves to suit your space.
You can create storage for gardening equipment, books, tools or toys. Choose materials to fit your budget and where you plan to use the shelf. The result is a one-of-a-kind piece you can be proud of.
How do I plan my corner shelf?
Good planning helps you avoid mistakes. Start by measuring the corner carefully. Few corners are exactly 90 degrees, so note the length of each wall and the angle between them.
Think about what you’ll store on the shelf. Heavy planters need strong shelves and a sturdy frame, while lightweight decorations allow for a more delicate design. Sketch your plan and include all the dimensions.
Pro tip
If the walls are uneven or the angles are complex, make a cardboard template first. Trim it until it fits the corner perfectly. Use the template as a guide for the back panel or side pieces to help avoid wasting material.
Choosing materials: wood, metal or a combination?
Wood is a classic choice. Plywood panels are strong and resist splintering, while solid wood such as pine or beech adds character. For outdoor use, pressure-treated wood is essential.
Metal profiles and phenolic-coated plywood panels create an industrial look that suits a workshop or garage. You can also combine wooden shelves with metal brackets for support. This keeps the shelf lighter while still providing stability.
What tools do I need to build a corner shelf?
You won’t need a large collection of tools. For accurate cuts, use a jigsaw or a circular saw with a guide rail.
A cordless screwdriver is essential for fastening the pieces together. Clamps hold components in place during assembly, while a square and tape measure help you measure accurately. For metalwork, you’ll need a metal drill bit and possibly a hacksaw.
Accurate angle measurements are key when building corner furniture. Spend twice as much time measuring as you do cutting.
Simple wooden corner shelf: step-by-step guide
These instructions describe a freestanding, open corner shelf with three shelves for indoor use.
1. Cutting the parts
Cut two triangular side pieces. The hypotenuse, or longest side, sits against the wall. The legs, or shorter sides, determine the shelf’s depth and height.
Cut the shelves as isosceles triangles or trapezoids, depending on your preferred shape. They will rest on cleats attached to the side pieces.
2. Preparing and joining the parts
Pre-drill holes in the side pieces for the shelf-support cleats. This helps prevent the wood from splitting. Screw the cleats firmly in place.
Join the two side pieces along the front edge with sturdy screws or a wood connector. This will make the frame more rigid.
Important note
Secure every tall shelf to the wall with wall brackets, especially if you have children or pets. A shelf that tips over can cause serious injuries. Wall mounting is an essential safety measure.
3. Installing the shelves and finishing
Place the cut shelves on the cleats. Secure them from below with small screws, or leave them loose if you want adjustable shelf heights.
Sand all the edges smooth, then apply a topcoat, stain or paint. Once it’s dry, place the shelf in the corner and secure it to the wall.
Creative ways to add more corner storage
Try a design beyond basic shelving. A rotating corner shelf, also called a carousel shelf, makes it easier to reach items stored at the back.
To make one, mount the shelf on a furniture dolly or a central pivot. This design works well in a workshop or sewing area.
A corner shelf with doors or drawers can hide clutter. Build a simple cabinet and add doors with hinges or drawers with slides. For heavy loads in the garage, sturdy tire rack designs can offer inspiration.
Additional tip
Use the back wall for extra storage. Attach a pegboard, hooks or narrow shelves to organize small items such as tools, pruning shears or craft supplies and keep them within easy reach.
If you’re renting or want a flexible setup, a mobile corner shelf is a good option. Add casters underneath so you can move it easily. A
(utility cart) shows how the idea works: sturdy baskets in a wheeled frame. You can build a similar unit from wood or metal and adapt it to fit a corner.
Corner shelves for gardens and outdoor spaces: special considerations
In the garden, a shelf needs to withstand the elements. Choose weather-resistant materials. Pressure-treated wood, stainless steel screws and a final coat of protective stain are the minimum requirements.
Leave larger gaps between shelves to make room for tall pots. A slight slope toward the back helps keep items from sliding off in windy conditions.
In winter, a clear patio furniture cover can protect your shelf from snow and moisture and significantly extend its life.
For outdoor use, I recommend a design without a base. Hang the shelf on the wall with sturdy brackets. This leaves space underneath for airflow, so the wood dries faster and is less likely to rot.
Ready-Made Solutions to Inspire Your DIY Project
You don't have to start from scratch. Take a look at how ready-made shelves are built. A
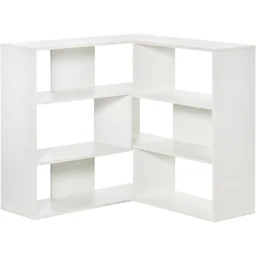
A classic wardrobe demonstrates a sturdy frame with doors. Features such as strong corner joints, door hinges, and interior compartments can be adapted for a smaller corner shelf.
Also browse categories such as Kids' seating. This furniture is often cleverly designed to fit into corners, combining seating with storage. You can adapt this space-saving idea.
Conclusion: Your Custom Storage Space Awaits
Building a corner shelf yourself is a rewarding project. You’ll have a tidier home and the satisfaction of making something practical with your own hands.
Start with a simple design and build your skills. Your next project will be even better. The empty corner in your home today could become your favorite spot for staying organized tomorrow.
Grab your tape measure, choose your materials, and get started. Your corner’s new storage space is just one weekend away.
Frequently Asked Questions
- What type of wood is best for a DIY corner shelf?
- For indoor use, plywood, laminated pine, or beech are good choices. They’re sturdy and easy to work with. For a garden or damp rooms such as a basement, choose pressure-treated wood, Douglas fir, or durable screen-printed plywood. These materials can withstand the elements. For sturdy shelves, make sure the material is at least 18 mm thick.
- How can I accurately measure the angle of a room corner?
- Most room corners aren’t exactly 90 degrees, so measure carefully. Place two large, straight boards in the corner and trace along their outer edges. You can also use an angle finder. For uneven walls, cut a cardboard template to use as a pattern for the back panel or side pieces. This transfers the exact angle to your material.
- Can I build a corner shelf without a drill?
- Yes, simple designs are possible. You can hand-tighten wood screws to attach predrilled shelf brackets and supports from a hardware store. However, a cordless screwdriver or a drill with a screwdriver setting is recommended for securely joining wooden parts. These tools create strong connections and save effort. Simple screw clamps can hold the parts in place during assembly.
- How can I make my DIY garden corner shelf weatherproof?
- Start with weather-resistant materials such as pressure-treated wood or aluminum profiles. Thoroughly coat wooden surfaces with a wood preservative or exterior paint, including the cut edges. Use stainless steel or galvanized metal connectors to prevent rust. A garden furniture cover protects the shelf during winter.
- What height and depth are best for a corner shelf in a child's room?
- In a child's room, the shelf should suit the child's height. A maximum height of 120 cm makes it easy to reach. Keep the shelves no deeper than 30 cm so children can easily reach toys at the back. Always secure the shelf to the wall with brackets to prevent it from tipping over. Sturdy, kid-friendly kids' shelves offer more inspiration.
You might also be interested in
- How to Build a Stackable Shelf: Practical Solutions for Your Home
- DIY Shelf with Built-In Speakers: Make Your Own Media Furniture
- How to Build an Industrial-Style Shelf: Step-by-Step Guide
- Build a Custom Desk Shelf: A DIY Project for Your Perfect Home Office
- Build a Pallet Plant Shelf: DIY Guide to Garden Furniture
- Upcycling Idea: Build Your Own Cassette Shelf