
In brief: Build a wood deck by first creating a sturdy base with support beams or steel supports. Then install the joists at the correct spacing. Finally, fasten the deck boards with the right gaps between them. Choosing the right wood, providing adequate ventilation, and allowing a slope of around 2% for drainage are key. With careful planning and the right tools, this is a manageable weekend project.
Your plan for the perfect wood deck
A wood deck turns your yard into an extension of your living space. You can build it yourself to save money and enjoy more freedom to customize the design. Success starts with thorough preparation.
First, assess the site. Will the area be in full sun or shade? This can affect your choice of wood. Measure the space carefully and sketch a plan with dimensions.
Set a realistic budget. High-quality deck boards and a sturdy substructure will be the biggest expenses. Remember accessories such as screws, washers, and connectors. Also budget for any tools you may need to rent.
Rushing is one of the most common causes of mistakes when building a deck. Allow at least one long weekend for assembly alone, plus several days to prepare the ground.
Choosing the right ground conditions
The ground supports the entire deck, so a firm, level, well-drained base is essential. Loose soil and topsoil are unsuitable because they settle over time.
Excavate the area to a depth of around 20-30 cm. Compact the ground with a plate compactor. Add a 15 cm layer of crushed stone or gravel, then compact the base thoroughly.
Cover the crushed-stone layer with a durable weed barrier. It helps prevent weeds from growing through the gaps in your deck. The fabric must allow water to drain through.
Important note
Before starting work, check whether utility lines run through the area you plan to excavate. Contact your utility provider or local building department for information. Accidentally damaging utility lines can be expensive and dangerous.
How do you build a stable substructure?
The substructure is the frame of your deck. It must support the weight of the boards, furniture, and people while allowing airflow and providing the required slope.
You can choose between two proven systems: a traditional frame made from treated lumber, or a modern system with adjustable steel or plastic supports on concrete pads.
A lumber frame requires precise cutting and assembly. Steel supports are easier to level and provide excellent ventilation. The best option depends on your skills and budget.
Planning the slope correctly
Without a slope, water can pool on your deck and cause the wood to rot faster. Plan a steady slope of 1-2% away from the house.
For a 4-metre-long deck, a 2% slope means a height difference of 8 cm. Mark the heights with stakes and a taut string line. Align all supports with the line.
For steel supports, adjust the feet as needed. For a lumber frame, cut the support points to the correct height. Check the slope with a level as you work.
Additional advice
If your deck is freestanding in the yard, plan the slope in one direction. At the lowest point, add a small drainage channel or gravel bed to carry water away.
Which deck boards are right for my project?
Deck boards come in a wide range of materials. Your choice affects the look, durability, maintenance, and price. The main options are solid wood and composite decking.
Wood deck boards made from domestic softwoods such as larch or Douglas fir are affordable and natural-looking, but need regular maintenance. Tropical hardwoods such as Bangkirai or Cumaru are highly durable, but more expensive and harder to work with.
WPC decking (wood-plastic composite) is made from wood fibers and plastic. It holds its shape, is easy to maintain, and does not splinter. Its appearance is more uniform than natural wood. WPC is a popular choice for garden and outdoor living spaces.
Many people underestimate how much wood weighs and moves. Buy your decking lumber several weeks before building and store it at the installation site in a sheltered, well-ventilated place. This gives it time to acclimate.
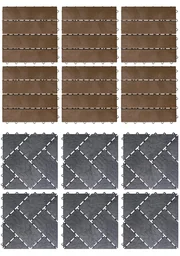
These wood-effect deck tiles offer a quick alternative. They can be installed directly on a level surface without a complex substructure. The set works well for small areas or temporary setups.
Choosing the right thickness and length
Board thickness determines the joist spacing. For 21 mm-thick boards, use joists spaced 40 cm apart. For 26-28 mm-thick boards, you can use spacing of 50-60 cm.
Choose board lengths that minimize waste. Plan the layout so the ends meet over a joist. Stagger the joints from row to row, like brickwork, for added stability.
How do you install deck boards correctly?
Now it is time to install the visible surface. Laying deck boards takes care and attention. Start at the longest, straightest edge, usually against the house.
Lay the first deck board and align it carefully. It sets the line for every row that follows. Fasten it with two screws at each support point. Use stainless steel screws with a Torx drive.
Use a 5-8 mm spacer between each deck board. The gap is essential: it lets water drain and gives the wood room to expand. Continue across the deck, one row at a time.
Pro tip
Pre-drilling helps prevent deck boards from splitting, especially with tropical hardwoods and near the ends of boards. Use a wood drill bit slightly thinner than the screw shaft. This makes installation easier and protects the wood.
How to handle joints and edges
Longer decks need joints. Always place them directly over a joist. Cut the deck boards with a jigsaw or circular saw, making sure each cut is clean and straight.
Finish the deck edges with fascia or trim boards. They give the structure a finished look and hide the cut ends of the joists. Fasten them from the side or at an angle.
If you plan to add steps, build them from the same material. Each step should have a tread depth of at least 30 cm and a rise of no more than 18 cm. Secure the front edges to help prevent slipping.
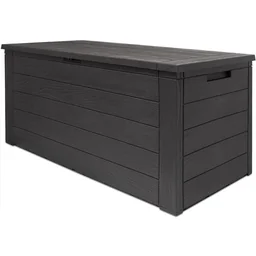
A practical storage box for cushions, blankets, or garden accessories helps keep your new deck tidy. The weather-resistant anthracite finish complements many wood and stone colors.
Protecting and caring for your wooden deck
A wooden deck is a living material. It needs protection from the weather and UV radiation. The first treatment is the most important.
Wait until the wood has fully hardened and dried. With fresh wood, this can take several weeks. Clean the surface thoroughly to remove dust and shavings. Then apply a special decking oil or wood stain.
Work in overcast weather. The wood should not be exposed to direct sunlight. Apply the oil evenly with a brush, roller or pad. Make sure it does not pool on the surface.
Regular basic cleaning
Remove leaves and dirt regularly with a broom. This prevents damp patches and moss from forming. Give your deck a thorough clean once a year.
Use a dedicated decking cleaner and a soft-bristled brush. For stubborn dirt, a pressure washer can help. However, hold it at a shallow angle and keep it at a sufficient distance to avoid roughening the wood fibres.
After cleaning, the deck must dry completely. Only then should you apply a new protective coating if necessary. The intervals depend on the type of wood and its exposure to the weather.

Protect your patio furniture or patio heater during the damp season. A sturdy cover extends the life of your investment and keeps everything ready to use next summer.
Furnishing and enjoying your deck
Your finished deck is your personal outdoor oasis. The furnishings should be functional and comfortable. Start with the larger pieces, such as a table and chairs.
An extendable dining table, such as those you can find in our garden furniture category, offers flexibility. On sunny days, a parasol or awning provides shade.
Lighting creates atmosphere. Choose solar-powered LED lights that you can install without cables. String lights, ground spotlights or torches make the evening more inviting. For longer evenings in spring or autumn, patio heating is worth considering.
With the right plants in pots or beds along the edges, you can integrate your deck perfectly into the garden. Choose low-maintenance, hardy varieties. A visit to our garden accessories department provides inspiration for planters and climbing supports.
Your DIY wooden deck is now ready. You have not only created valuable living space, but also completed a project with your own hands. Enjoy every summer evening on it.
Frequently asked questions
- Which wood is best for a long-lasting wooden deck?
- Locally sourced woods such as larch or Douglas fir, as well as particularly hard-wearing tropical hardwoods such as bangkirai or garapa, are suitable for durable decks. WPC decking boards (wood-plastic composite) are a low-maintenance alternative with high dimensional stability and no risk of splinters. The choice depends on your budget, the look you want and how much maintenance you are prepared to do. Locally sourced woods require regular oiling, while tropical hardwoods are more expensive but last longer.
- What slope does a wooden deck need and how do I create it?
- A slope of 1-2% away from the house is essential for water drainage. Create it by laying the supports for the joists (e.g. steel bearers or point foundations) at a slight angle. Use a spirit level with a slope indicator or a string line. Calculate the height difference: for a deck length of 4 metres, a 2% slope means an 8 cm difference in height. Take this into account when planning the deck height in relation to the house threshold.
- Can I build a wooden deck directly on soil or concrete?
- You should never build directly on soil. Moisture leads to rot. A compacted gravel or chippings base with a weed membrane is the minimum requirement. A deck can be built on sound, dry concrete (e.g. an old patio slab) provided you ensure adequate ventilation beneath the boards. To do this, use special spacers or continuous joists on strip supports that allow air to circulate.
- How much space should there be between decking boards?
- A gap of 5-8 mm is standard. It allows water to drain away and gives the wood room to expand and contract as moisture levels change. Use special decking spacers or joint crosses from a specialist garden tool retailer to maintain an even gap. With very damp wood or in a shaded location, you can allow up to 10 mm of space. The gaps remain open after installation.
- When should I oil my new wooden deck for the first time?
- Treat pressure-treated wood after 4-6 weeks and locally sourced woods such as larch after 2-3 months. The wood must be completely dry and clean. With tropical hardwoods, check whether the surface still absorbs water. If it is water-repellent, no immediate treatment is needed. Use a high-quality decking oil that penetrates deeply and provides UV protection. Work in dry weather and shaded conditions.
You might also be interested in
- Wooden deck substructure: Build a stable foundation with ease
- Build a raised deck: DIY guide for your wooden deck
- Build your own patio cover: Step by step
- WPC decking boards: Benefits and care for your deck
- Laying patio tiles: Your path to a dream patio
- Paving a stone patio: Step-by-step guide for DIY enthusiasts