
In brief: Yes, you can convert a carport into a shed if the foundation, supporting structure and building regulations allow it. Enclose the open sides with weather-resistant walls, protect the roof and floor against moisture, and plan doors, ventilation, and electrical and water lines before installing the cladding. This creates a dry, usable storage space for garden tools, bicycles and equipment.
With a manageable amount of work, an open carport can become a sheltered shed for garden equipment, bicycles, firewood and seasonal items. A dry foundation, sturdy walls, adequate ventilation and a secure door are essential. If you also plan to add a water connection, decide on the pipework and fittings before installing the cladding.
What requirements should you check before converting a carport?
Before ordering materials, inspect the existing carport carefully. Measure its length, width and height, photograph the utility connections, and plan where doors, windows and shelves will go. A carport with sufficient height is easier to enclose, while low structures quickly lose usable space.
Check the posts, crossbeams, rafters and roof covering for rot, rust, cracks and deformation. Press a screwdriver into any suspicious areas of wood. Soft wood, loose post anchors or sagging rafters must be repaired before the conversion. A new wall must not conceal damaged structural components.
The floor also determines how the space can be used. Water must drain away from the building rather than collect around the posts. If you have a concrete slab, check its slope, cracks and rising damp. With paving or gravel, you need a level, load-bearing surface and a structure that does not have direct contact with the ground.
Important note
Before converting the carport, check local building codes, zoning regulations and other local requirements. Enclosed exterior walls can change how the structure is classified under building regulations. If the carport is built close to a property line, has larger dimensions or is changing use, discuss the project with your local building department.
What should you check about the foundation and supporting structure?
- Posts: Check their stability, anchors, corrosion and clearance from the ground.
- Roof: Look for leaks, damaged panels, loose screws and inadequate drainage.
- Walls: Plan additional framing so loads are transferred safely into the foundation and posts.
- Floor: Remove standing water and create a durable, easy-to-clean surface.
Which clearances and changes of use matter?
A shed with enclosed sides is structurally different from an open shelter. This is especially important if you plan to heat the space, use it permanently as a workshop, or connect water and electricity. Maintain clearances from property lines, windows and neighboring buildings. Record the existing dimensions before installing any new components.
How should you plan the new garden storage space?
Divide the space according to how you will use it. Garden tools need an easily accessible wall, bicycles require plenty of room to maneuver, and firewood should stay dry without being placed directly against an exterior wall. For a practical garden storage shed, create a floor plan with at least one clear central walkway.
Plan the doors first. Double doors make it easier to move a lawn mower, wheelbarrow or rain barrel in and out. The clear opening must accommodate your largest piece of equipment, not just the existing door leaf. Ideally, doors should open outward so shelves and a workbench remain fully usable inside.
Windows provide daylight but also increase exposure to rain and break-ins. A narrow window high in the wall is often sufficient. Add ventilation openings with insect screens. This keeps the space dry without weakening every wall with large areas of glass.
How should you organize the shed?
- Frequently used items: Hang spades, rakes and pruners near the door.
- Heavy equipment: Place lawn mowers and bags on the floor or on a low, sturdy platform.
- Small items: Store seeds, fertilizer and fastening materials in closed boxes.
- Water area: Install fittings on an easily accessible wall protected from splashing water.
- Maintenance: Leave enough space in front of filters, faucets and hose connectors for repairs.
If you are building a garden shed, plan for future additions. Installing an empty conduit for an additional line costs little during the rough construction phase and saves you from opening the cladding later. The same applies to wall mounting points. Reinforce areas for shelves, wall cabinets or a bicycle rack before fitting the exterior cladding.
Where should water and electrical lines run?
Mark every line on the floor plan. Water pipes should be short, accessible and protected from freezing. Electrical cables must run through suitable protective conduits and should not be improvised through the same narrow cavity as water pipes. Plan to use a qualified professional for permanent electrical and drinking water installations.
“Rainwater is not drinking water and must not enter the drinking water system.”
How do you convert the carport into a DIY shed step by step?
Work from the outside in and keep the structure braced throughout the conversion. Do not remove several load-bearing components at the same time. A dry, calm day makes installation easier, especially when fitting panels, doors and roofing sheets.
- Assess the existing structure: Empty the carport completely, measure all sides and mark any damage. Remove loose cladding, damaged roof panels and rusty fixings.
- Prepare the foundation: Clean the slab, repair cracks and check the slope. On paving, install a stable substructure with spacers and a level support surface.
- Repair the supporting structure: Replace rotten posts and reinforce unstable connections. Use galvanised or stainless-steel screws for outdoor applications and brace new frames against twisting.
- Install the wall frames: Fit vertical studs between the posts and connect them at the top and bottom with rails. Leave openings for the door, window, ventilation and planned services.
- Prepare the services: Install conduits, water pipes and drainage points before closing the walls. Photograph the layout and note measurements from fixed reference points.
- Install the floor: Seal the transitions to the walls without blocking the necessary ventilation gap. A durable panel floor, concrete or waterproof-coated floor panels withstand dirt and moisture better than untreated wood.
- Fit the door and window: Carefully align the frame and door leaf. Check the diagonals before tightening the screws fully. Seals protect against driving rain, while a threshold prevents standing water inside.
- Close in the exterior and roof: Install the wall and roofing materials with suitable overlaps, screws and seals. Direct rainwater away from the foundation via a gutter and check all connections during the first spell of heavy weather.
Pro tip
Install a test section before fitting the final cladding. Use it to check screw spacing, ventilation, water drainage and the effect of the surface treatment. Mistakes on a small section can be corrected quickly, whereas a completely enclosed wall requires extensive dismantling.
For a DIY installation, focus mainly on work that does not involve modifying the fixed electrical or drinking water installation. This includes painting, fitting shelves, installing non-load-bearing cladding and sealing visible joints. As soon as you connect services or modify load-bearing components, you have moved beyond the safe scope of DIY work.
How do you clad and ventilate the shed?
Choose the exterior cladding according to the location and the level of maintenance required. Profile boards made from treated wood complement a garden visually, but require regular checks and renewed protective coating. Fibre cement or metal profiles are easier to maintain and more resistant to splash water. Leave a ventilated cavity between the wall and the cladding so that moisture can dry out.
Do not place the bottom edge of the exterior cladding directly on the ground. A plinth, drip edge and sufficient clearance from splash water extend its service life. Seal exposed cut edges according to the manufacturer's instructions. Otherwise, rot can quickly develop, especially at corners, door frames and the bottom edges of walls.
What insulation does an unheated shed need?
For storage purposes alone, you usually do not need full insulation. An insulated wall can even cause problems if the inside and outside are sealed without a coordinated moisture-control system. Decide how you intend to use the shed first. A workbench, frost-sensitive equipment or a heated room requires a different wall construction from an unheated garden shed.
If you insulate, use a planned layer structure with suitable airtightness and moisture protection. Have the details at transitions, window reveals and roof connections checked by a professional. For a simple shed, a robust, ventilated exterior is often the more durable solution.
How do you prevent damp and mould?
Arrange the ventilation so that air can flow through the room. An opening low down in one wall and a second opening higher up on the opposite side create natural air exchange. Grilles prevent mice and insects from getting inside. Do not place furniture or boxes directly against the exterior walls.
The roof must be watertight, the walls must be able to dry out and the floor must not absorb moisture. These three conditions work together. Check the interior after rain, frost and extended periods of damp weather. This helps you identify leaks before tools or seed are damaged.
How do you integrate a water connection and garden irrigation?
A water connection in the garden makes your converted carport more versatile. You can fill watering cans, connect hoses, clean equipment and supply an automatic irrigation system. First decide whether you will use mains water, rainwater or a separate garden water line. The systems must not be connected to one another without suitable safety measures.
For a mains water line, you need a professionally installed shut-off, suitable pipe materials and backflow protection. The indoor connection should be dry, accessible and as frost-free as possible. A line through the external wall needs a watertight seal and a gradient for draining.
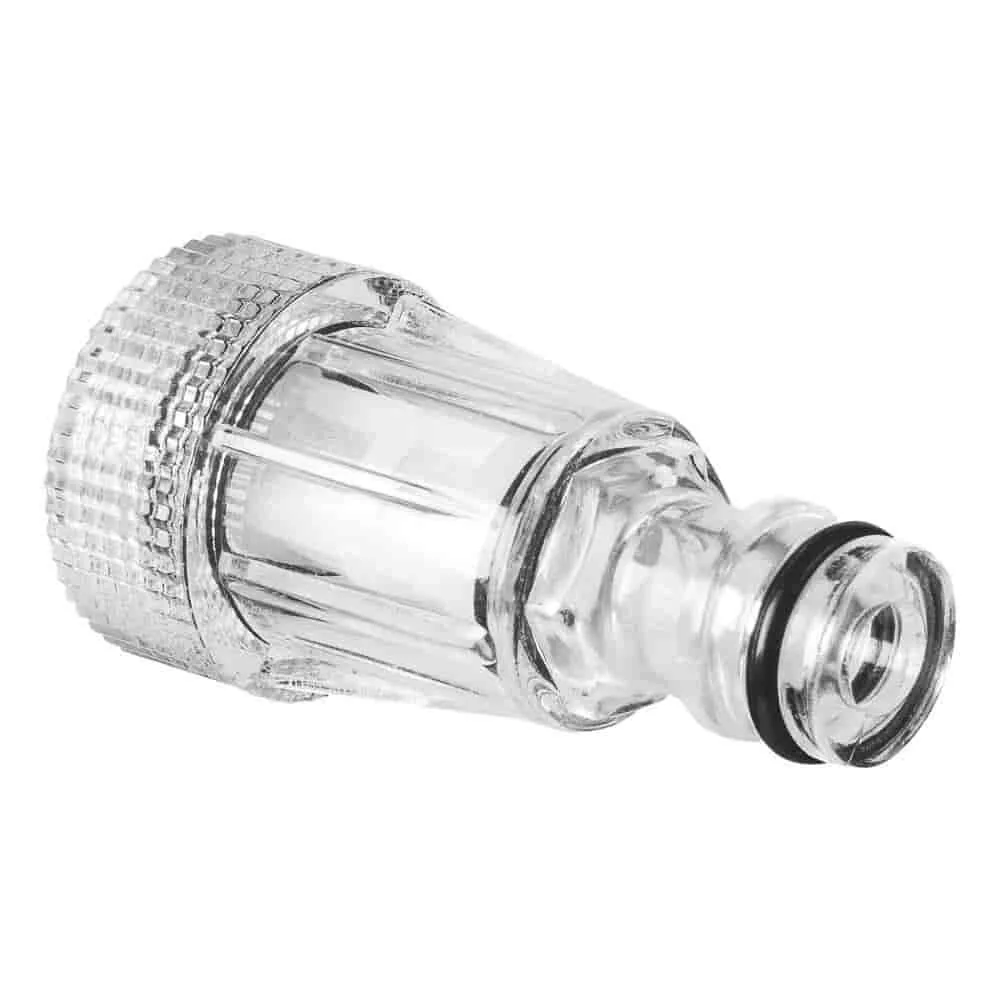
For filtering the supply line, the 3/4 inch water filter is ideal. It traps particles that could affect taps, hose connectors or sprinklers. Install the filter so that you can unscrew and clean it. A filter does not replace a hygiene check of the water source.
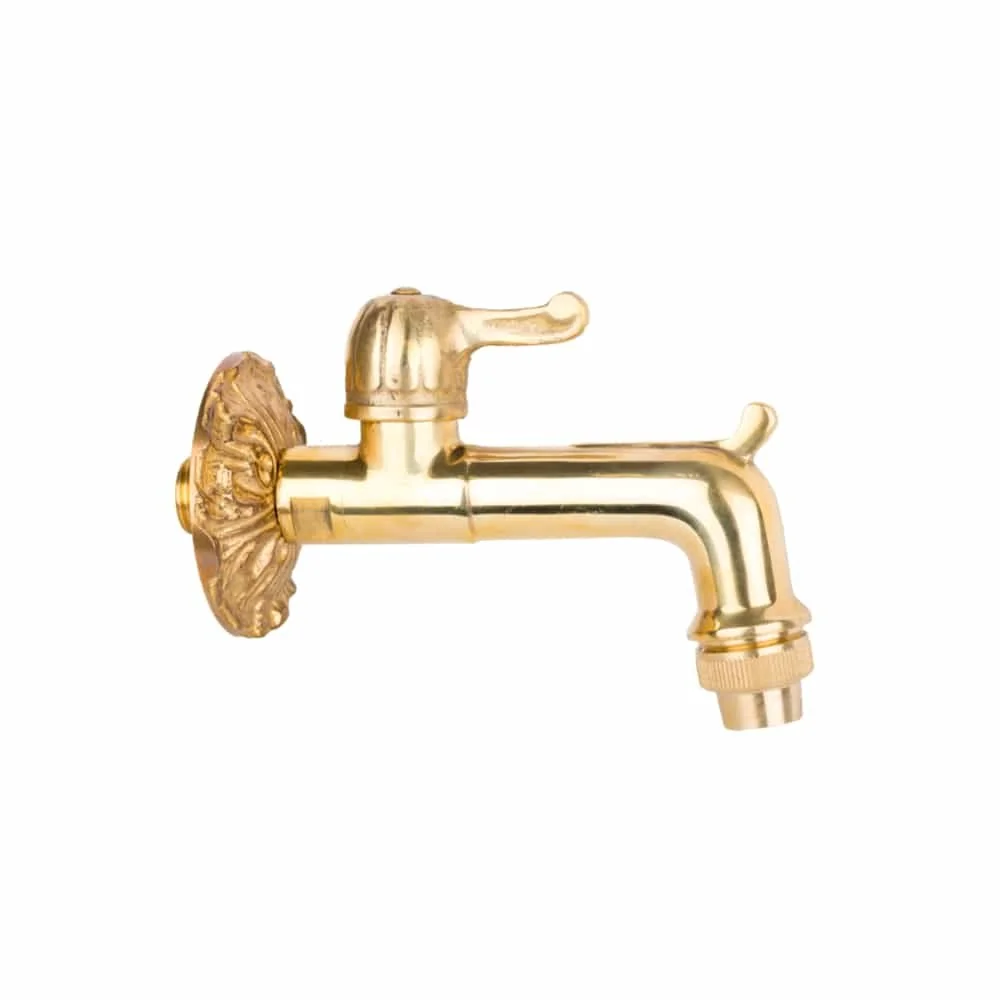
For an easily accessible outdoor tap, you can plan for the 1/2 inch bibcock. Position the tap so that a bucket fits underneath and the hose runs without sharp bends. A separate shut-off valve inside makes maintenance and winter preparation easier.
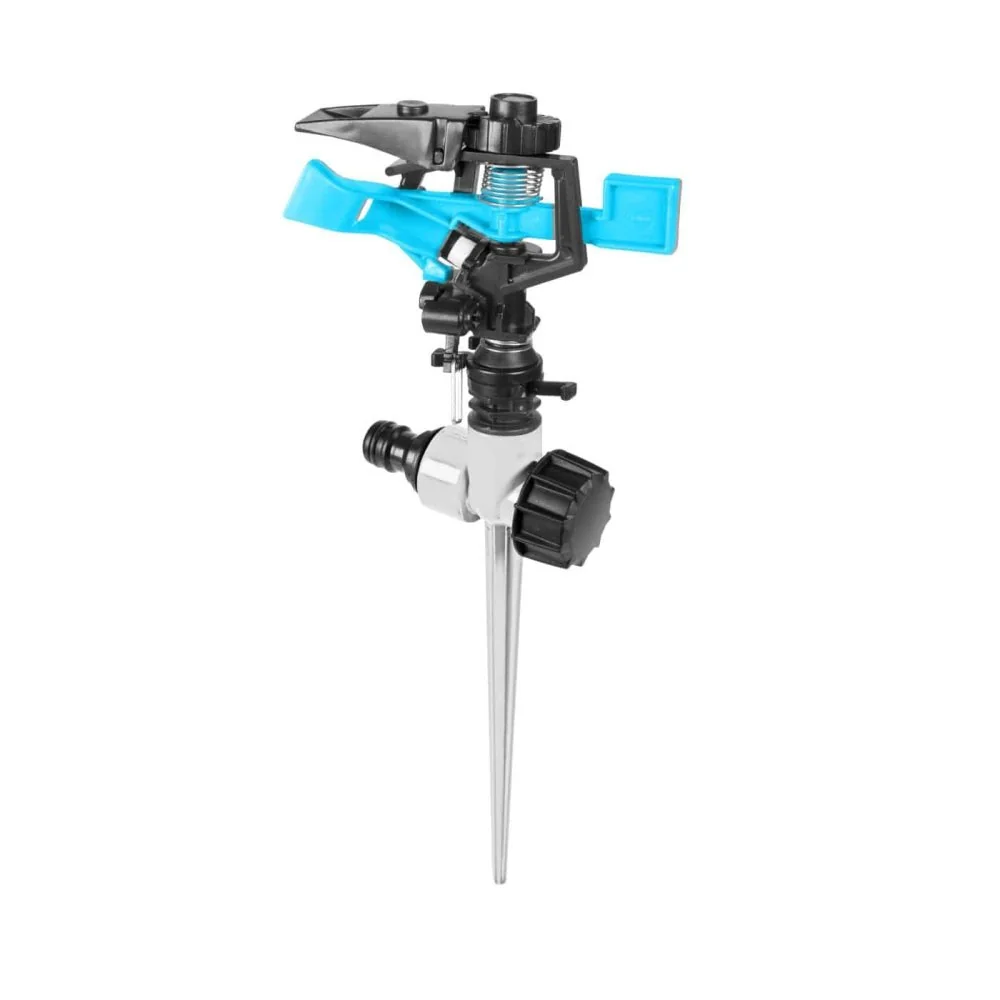
For simple garden irrigation with a wide coverage area, the impact sprinkler with ground spike is a good choice. It can be used outside the shed and moved as required. The water supply should still have an accessible connector and shut-off tap. This makes it easier to identify problems if the pressure drops.
You can find suitable components for pipes and sprinklers in the garden irrigation category. The water filters category is also useful for the supply line and filtration. For longer distances, use a suitable water hose or a permanently installed pipe.
What steps are needed for a frost-protected water connection?
- Define the source: Check the pressure, flow rate and permitted use of the existing connection.
- Determine the pipe route: Run the pipe in a protected, short route with a gradient towards a drainage point.
- Install a shut-off: Fit an indoor valve in an easily accessible location.
- Install the filter: Leave enough room for cleaning and replacing seals.
- Fit the outdoor tap: Seal the wall penetration and prevent standing water in the outdoor section.
- Test the system: Open the tap slowly, check all connections and test the drainage.
When using rainwater from a water butt or cistern, keep the installation separate from the mains water network. A hose can connect the pump or outlet to the irrigation system. Ensure adequate protection against algae, frost and dirt. During longer dry periods, check whether the source and supply are sufficient for your plants’ needs.
“Work on electrical installations may only be carried out by qualified electricians or under their direction and supervision.”
What features make the shed practical in the long term?
How can you create storage space without clutter?
Make consistent use of the walls. A pegboard, sturdy hooks and narrow shelves keep frequently used tools close at hand. Store heavy equipment at the bottom and lightweight boxes higher up. Label closed containers and leave a clear working area in front of each shelf.
For suitable additions for your converted carport, take a look at the garden equipment and garden tools categories. The Garden + Outdoor category brings together further solutions for using the area around your shed.
How can you secure the door, windows and tools?
Use a sturdy lock, protected hinges and a locking mechanism that cannot be reached through a window. Secure valuable equipment additionally with a floor or wall anchor. An outdoor light with a motion sensor improves visibility and deters opportunist thieves.
If you want to install fixed lighting or sockets, have the planning and installation carried out by a qualified electrician. Moisture, long cable runs and inadequate safety measures increase the risk. Suitable portable lights can be a practical alternative for a simple unheated shed.
What does it cost to convert a carport?
The cost depends mainly on the condition, wall material, door, floor and extent of the wiring and plumbing. A carport with an intact foundation and roof can be enclosed much more cheaply than a structure with rot, inadequate drainage and damaged posts. Before shopping, make a list of materials, tools, transport and professional work.
| Area | Typical effort | What to consider |
|---|---|---|
| Structure and repairs | low to high | Repair damage before installing the cladding |
| Walls and door | medium to high | Plan for the weather-facing side, fixings and door width |
| Floor and drainage | low to medium | Direct moisture away from the building |
| Water connection | low to medium | Allow for frost protection, a filter and a shut-off valve |
| Electrical installation | medium to high | Plan for a qualified contractor and safety measures |
Additional advice
Schedule an annual inspection in spring. Check the roof, joints, screws, door seals, post bases, water filter and drainage. Clean the interior and remove damp cardboard immediately. Small repairs prevent a dry storage area from becoming a damp shelter again.
What mistakes should you avoid when converting the carport?
- Setting the walls directly on the ground: Moisture rises into the cladding and damages wood or insulation.
- Failing to plan for ventilation: Trapped moisture causes odours, mould and rot.
- Making the door opening too small: Large equipment will be difficult to move in and out later.
- Hiding cables and pipes without documenting them: Repairs become unnecessarily complex and risky.
- Installing a water connection without frost protection: Frozen water can damage filters, taps and pipe connections.
- Ignoring building regulations: An apparently minor conversion may be assessed differently once the walls are enclosed.
A well-planned carport conversion combines protection, storage space and convenient access in the garden. Start with the structure, floor and drainage. Then move on to the wall construction, door, ventilation and interior fittings. If you add water or electricity, determine the cable and pipe routes early and leave fixed installations to qualified contractors.
Frequently Asked Questions
- Do I need permission to convert a carport into a shed?
- That depends on your region, property, size and local development plan. Once you enclose the walls, the structure may be assessed differently under building regulations than an open carport. Before starting the conversion, check the applicable building regulations, local bylaws and required distances. Contact your local planning authority if the requirements are unclear.
- What type of floor is suitable for a converted carport used as a shed?
- A solid, dry concrete or block-paved floor is best. If the carport stands on an existing slab, check it for cracks, adequate falls and damp. With a wooden floor, you need a ventilated substructure and clearance from the ground. Store heavy equipment only on surfaces with sufficient load-bearing capacity.
- How can I prevent frost damage to the water connection in my garden shed?
- Install the pipe in a frost-free location wherever possible, or run it with a fall towards a drain point. Fit an internal shut-off valve and an external frost-proof tap. Before winter, shut off the supply, open the outdoor tap and drain the filter, hose and fittings completely.
- Which carport conversion jobs can I do myself?
- You can handle simple jobs such as clearing out the space, painting, fitting shelves and installing non-electrical wall cladding yourself. Fixed electrical wiring, new drinking-water pipes and structural alterations require qualified contractors. Have cable and pipe routes checked before closing the walls, and document all connections before first use.
- How do I ventilate a converted carport used as a shed properly?
- Plan at least two ventilation openings on opposite walls or at different heights. Grilles with insect mesh keep animals out. You can also ventilate through windows or a roof gap, while preventing driving rain from entering. Do not place boxes directly against the external wall, and allow wet equipment to dry before storing it.
You might also be interested in
- Building a carport or garage: planning, permits & DIY tips
- Build your own carport: step-by-step guide to your own shelter
- Convert a rabbit hutch into a party terrace: DIY guide
- Build your own garden shed: step-by-step guide
- Build your own garden hut: your little garden paradise
- Build your own garden bar: DIY guide for the garden