
In brief: Sanding wood floors removes old finishes and uneven spots, leaving a smooth, fresh surface. You’ll need a drum or belt sander for the main floor and an edge sander for the edges. Start with coarse sandpaper and work your way up to a fine grit. After sanding, clean the floor thoroughly and seal it with oil, wax, or varnish for lasting protection.
Why you should sand your wood floors
Old wood floors have plenty of character. But scratches, worn varnish, and dark stains can dull their charm. Sanding restores your floor’s natural beauty by removing old finishes and minor imperfections.
Sanding exposes fresh wood so you can apply a new finish. Compared with replacing the floor or installing new flooring, sanding is a cost-effective option. The result is a unique floor with character that can’t be replicated.
You’ll have a refreshed, one-of-a-kind floor made from the original wood, and you can choose the color and finish. This DIY project takes time and effort, but it can save you a lot on labor costs.
What tools do you need to sand a wood floor?
The right equipment is key to getting good results. For the main floor, you’ll need a drum sander or a three-disc floor sander. These machines cover large areas quickly and evenly. You can rent professional-grade equipment from a hardware store.
An edge sander is essential for the edges and corners the larger sander can’t reach. It uses a round sanding disc. A handheld sander or multi-tool can help in tight spots, such as recesses around radiators.
Pro tip
Test the belt sander on a piece of scrap wood or in an inconspicuous corner before using it for the first time. This helps you get used to its pull and prevents deep gouges in your valuable wood floor.
Sandpaper in different grits is the supply you’ll use most, so make sure you have enough. A shop vacuum with a fine dust filter isn’t a luxury; it’s a necessity. It helps control dust and protect your lungs.
Don’t forget basic safety gear: hearing protection, an FFP3 respirator, safety glasses, and knee pads. The noise is considerable, and wood dust gets everywhere.
Preparation: How to get your DIY floor project started
Clear the room completely. Remove all furniture, curtains, and pictures. Cover built-in items such as radiators with drop cloths. Take the doors off their hinges so you can work on the thresholds, too.
Check the condition of the floor. Secure any loose boards. Use a nail punch to drive protruding nail heads about two millimeters below the surface. Remove old carpet adhesive or hard wax completely, as either can clog the sandpaper right away.
Important note
Before you start, turn off all the circuits in the room at the breaker panel. You may encounter old cables or wires when driving in nails. Electric shock is a real hazard during this work.
Clean the floor thoroughly. Vacuum and mop it to remove loose dirt. Even a small stone under the sander can leave deep scratches. Seal the gaps around the door with tape and plastic sheeting to keep dust in the room.
Plan your sanding route. Always start diagonally across the grain, at an angle of about 45 degrees. This is the most effective way to remove old finishes and smooth out major imperfections.
In practice: How to sand your floor step by step
Start with a coarse grit. Fit 40 or 60 grit sandpaper in the belt sander. Make long, even passes diagonally across the room. Keep the machine moving to avoid creating dents.
Turn on the vacuum. The first pass produces the coarsest dust. After sanding the entire floor diagonally, switch to sanding parallel to the grain. This smooths the grooves left by diagonal sanding.
Patience is the most important skill when sanding. Good results come from working systematically through increasingly finer grits, not from pressing harder. Rushing will always leave waves in the floor.
Switch to a medium grit. Replace the paper with 80 or 100 grit. Sand parallel to the grain. This pass removes the marks left by the coarse paper. Repeat the process with the edge sander along all the edges.
Finish with 120 or 150 grit. This final pass prepares the surface for sealing and leaves it silky smooth. Carefully vacuum every speck of dust after each step and after the final sanding.
Sealing and protecting: How to care for your wood floor
After sanding, the wood has no protection. Now it’s time to choose a finish. Hardwax oils combine the nourishing properties of oil with the surface protection of wax. They’re a good choice for high-traffic rooms.
Pure oil penetrates deeply and brings out the grain naturally. It needs regular maintenance. Clear varnish forms a hard, easy-to-clean film on the surface, but it’s harder to repair if damaged. For outdoor use or other demanding surfaces, you can find durable alternatives such as tarps for wood or specialty coatings.
Additional advice
Apply the first coat of finish thinly and evenly, using a paint roller on the main areas and a brush along the edges. Always test the product first in an inconspicuous area or on a piece of scrap wood to check the final color.
Work in a well-ventilated room without drafts. Keep dust off the floor. Let each coat dry according to the manufacturer’s instructions before applying the next one. Two or three thin coats are better than one thick coat.
After the final coat, the floor needs time to cure. Don’t walk on it for at least 24 hours, and then only in socks. It may take several days before the floor can handle normal use. Treat it gently during the first week.
Care after refinishing: How to keep your floor looking beautiful
Proper care extends the life of your sanded floor. Mop it regularly with a slightly damp mop. Use cleaners made specifically for oiled or varnished wood. Harsh chemicals can damage the finish.
Protect the floor from scratches. Felt pads under furniture legs are essential. Place runners in high-traffic areas. For oiled floors, apply maintenance oil every few months.
A sanded, well-maintained wood floor develops a patina over time. That’s part of its character. The goal isn’t perfection; it’s a warm, lively floor that reflects life at home.
Monitor the humidity. Dry air from winter heating can cause wood to shrink. A humidifier can help. Direct sunlight can fade wood, so use blinds or curtains for protection. For storing wood or other materials in the garden, a wooden Big Bag can come in handy.
You can often repair localized damage. Small scratches in oiled floors can be concealed with a spot-repair oil pen. On varnished floors, you can sand and revarnish the affected area.
Alternatives and inspiration for wood at home
Sanding solid wood isn’t the only option. For outdoor spaces or carports, low-maintenance materials are a practical choice.
, patio pavers with a wood-plank effect give your patio a warm look without any sanding.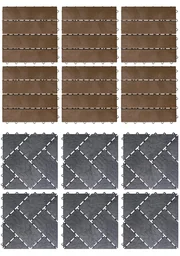
WPC decking boards are a modern option for cladding carport sides or privacy screens.


Wood can also inspire other living spaces. In a child’s room, wooden toys or wooden decorative letters create a natural feel. Comfortable floor cushions for kids invite them to play on their beautiful new floor.
Choosing wood means choosing durability and style. Whether you sand old floorboards yourself or choose a modern alternative, wood brings warmth to your home. Your refinished floor will become the room’s focal point.
Frequently asked questions
- Can you sand any wood floor?
- No. Check the thickness of the wear layer first. If it’s too thin, you could sand right through it. Solid wood floors can be sanded several times, while prefinished flooring can often be sanded only once or twice. Floors with severe damage or woodworm may need repairs first.
- What sandpaper grit should I use on wood floors?
- Use three grits of sandpaper. Start with coarse 40-60 grit to remove old paint or varnish and deep scratches. Use medium 80-100 grit to smooth the surface. Finish with fine 120-150 grit for a silky-smooth surface ready for sealing.
- How long should I wait after sanding before sealing a wood floor?
- Wait until all sanding dust is completely removed and the wood has acclimated. After the final vacuuming and damp mopping, wait at least 24 hours at normal room temperature and humidity. The wood must be dust-free and dry so the sealer can adhere properly.
- What’s best for wood floors: oil, wax, or varnish?
- Oil penetrates deeply, enhances the grain, and is easy to repair, but it needs regular maintenance. Wax gives the floor a soft, natural sheen and is also easy to repair. Varnish creates a hard, low-maintenance surface, but it can scratch and is harder to touch up. The right choice depends on how you’ll use the floor and the look you want.
- How can I keep dust from spreading through the house while sanding?
- Close doors and cover doorways with plastic sheeting. Use a sander with a built-in dust bag. Connecting a shop vacuum directly to the sander works even better. An air purifier in the room can also help filter the finest particles from the air.
You may also be interested in
- Wood floorboards: timeless charm and practical tips
- How to refinish a wood floor at home
- How to sand wood: a guide to smooth surfaces for DIY projects
- How to build a deck: create your new wood patio
- How to install laminate flooring: the complete DIY guide
- How to install herringbone parquet flooring: a DIY guide