
In brief: You make twisted candles from two or more coloured wax strands that you warm, twist and shape into a stable, spiral candle. You need candle wax, wicks, colour pigments and patience while they cool. The result is a unique work of art for table decorations or gifts.
Make twisted candles yourself
Twisted candles, also known as spiral candles, instantly add atmosphere to your home. You can make this decoration from simple materials. The principle is straightforward: shape soft wax strands into a stable spiral.
This project combines creativity with practical skill. You control the colours, thickness and intensity of the twist. The result is always one of a kind.
To start, two contrasting wax colours are enough. Later, you can experiment with several strands or embedded glitter particles.
What materials do you need?
The basic equipment is easy to assemble. Candle makers can find most items in specialist shops or online. The quality of the materials determines the final result.
You can buy candle wax in blocks or granules. Paraffin wax is suitable for beginners. Stearin wax is firmer and produces more stable twists.
Essential tools include wicks, melting pots, a thermometer and colour pigments. Do not forget a heat-resistant work surface.
Important note
Always wear heat-resistant gloves. Melted wax reaches high temperatures and can cause serious burns. Keep children and pets away throughout the melting and pouring process. Make sure the room is well ventilated.
Choosing the right wax
Paraffin wax melts at around 60 degrees Celsius. It is soft and easy to work with. However, twisted candles made from it are somewhat more delicate.
Stearin wax melts at higher temperatures. The resulting strands are firmer. This makes it easier to twist more complex patterns precisely.
Soy wax or beeswax are natural alternatives. They require more precise temperature control. Twisting works differently with these materials because they solidify more quickly.
Wicks and colouring agents
Choose wicks that match the thickness of your planned candle. A wick that is too thin will burn away. A wick that is too thick will produce soot and melt too much wax.
For colour, use special wax pigments or colour blocks. Food colouring and watercolours do not work. They do not bind to the wax and can be dangerous.
For metallic effects, mix in fine metal powder. Only use products approved for candle making.
How do you prepare the wax strands?
The first step is to melt and colour the wax. Divide the amount of wax according to your desired colours. Melt each colour separately.
Heat the wax slowly in a bain-marie. Stir regularly to ensure even heat distribution. Avoid heating it directly without a water bath.
Measure the temperature. Depending on the wax, the optimum pouring temperature is between 65 and 85 degrees Celsius. Wax that is too hot can damage the wick.
The consistency of the wax when pouring is crucial. It should flow like thin honey. Wax that is too viscous creates air pockets in the strands, which can later break when twisted.
Pouring the strands
Pour the coloured, liquid wax into long, narrow moulds. Silicone moulds for candle strands are ideal. Alternatives include greased baking trays or special channels.
Place the wick in the centre of the mould before pouring in the wax. The wick must be pulled taut. This keeps it straight inside the solidified strand.
Allow the strands to cool and harden completely. This process takes several hours. Rushing it will result in brittle material.
Pro tip
Pour the wax strands the day before you plan to twist them. This gives them maximum stability. Store them at room temperature. Strands that are too cold will break when bent. Strands that are too warm will lose their shape.
How do you twist candles correctly?
Now the creative part begins. Take two or more hardened wax strands in different colours. The strands should be the same length and a similar thickness.
Warm the strands carefully with a hairdryer or over warm water. The aim is to achieve a soft, flexible consistency. The wax must not melt or become sticky.
Place the warmed strands parallel to one another. Secure one end to a firm work surface. Slowly and evenly twist the other end.
The twisting technique
Twist the strands in one direction. A gradually tightening spiral will form between your hands. Apply even pressure.
Stop when you have achieved the desired twist density. The candle will contract slightly more. Allow for this when considering the length.
Carefully lay the twisted candle down straight. Hold the ends in place until the wax has hardened slightly and the shape holds.
Most beginners make the mistake of being impatient. They twist too quickly or use strands that are too cold. The result is uneven twists or breaks. Slow, controlled movements produce the most beautiful spirals.
Shaping and finishing
After twisting, gently shape the candle with your hands. Smooth out any uneven areas. Make sure the wick is exposed at both ends.
Trim the wick to about one centimetre. If necessary, trim the other end of the candle as well to create a flat base.
Leave the finished twisted candle to rest for at least twelve hours. Only then is it ready to light for the first time.
How do you create patterns and colour gradients?
More than two coloured strands open up new possibilities. Place three or four strands together and twist them as a bundle. This creates complex, multicoloured spirals.
For a gentle colour gradient, do not colour a large block of wax completely. Mix pigment into only part of it as it melts. Pour the strand. This creates a strand with an intense colour at one end and natural wax at the other.
Twist two strands like this together with the lighter ends aligned. The gradient will repeat throughout the spiral.
Additional advice
For even patterns, mark the wax strands with a waterproof pen before twisting. Draw lines at the desired intervals. These guide marks show you how far to twist to repeat the pattern precisely. Once the wax has hardened, simply wipe away the pen marks.
Embedded decorations
You can embed small elements in the wax strands. These include dried flowers, small cinnamon sticks or glitter.
Embed these objects before pouring the strand. Place them in the mould and carefully pour the wax over them. Make sure nothing touches the wick.
When twisted, these elements remain visibly enclosed in the spiral. They create a striking 3D effect.
What alternatives are there to real flames?
Twisted Candles do not necessarily have to burn. You can make them purely decorative. In this case, you can leave out the wick. The twisted shape is made in exactly the same way.
Using LED candles is even simpler. They are flame-safe and ideal for places such as trolleys with trays at events or in households with children.
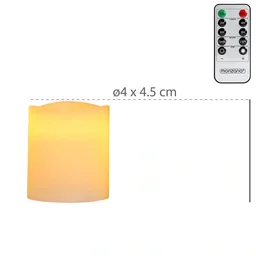
: The set of 6 flameless LED candles provides the foundation. Wrap these plain candles with your self-twisted, wickless wax tubes. This combines safety with an individual design. and are further LED options. They are currently out of stock but show the available range.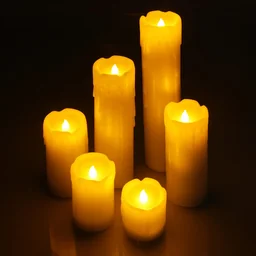
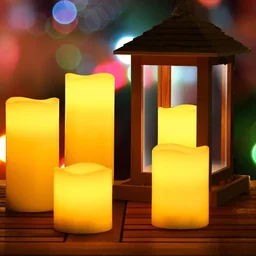
How can you incorporate Twisted Candles into your décor?
Twisted candles make an attractive standalone piece on a mantelpiece or sideboard. Combine several differently twisted candles at various heights to create an ensemble.
For the garden table, choose weather-resistant versions or protect them under a glass cloche. Remember to use suitable tarpaulins with eyelets to store your craft supplies outdoors.
Twisted Candles also make perfect personalised gifts. Match the colours to the recipient's taste.
Creative projects with children
Crafting with wax encourages children's creativity. The actual candle-making process with hot wax should be left to adults.
Children can be a great help with the design. They can choose colour combinations or twist preheated, thick strands of wax into simple shapes.

Store such craft projects safely in a chest of drawers. This keeps everything tidy and protected from curious pets.
What are the most common mistakes and how can you avoid them?
The most common mistake is using wax that is too cold. It breaks when twisted. Always heat it sufficiently until it becomes pliable.
Uneven strand thickness leads to irregular twists. Use identical moulds for all strands. Measure the liquid wax before pouring.
Do not forget to secure the wick before pouring. A crooked wick makes the candle unusable. It will then burn unevenly.
Do not be discouraged. The first attempts are a learning process. Each twisted candle will be better than the last.
Making Twisted Candles yourself is a rewarding hobby. You can create unique pieces for your home. With our guide, you can safely get started on your first twisting project.
Frequently Asked Questions
- Which wax is best for making twisted candles?
- Paraffin wax is the classic choice for beginners because it melts easily and is easy to shape. Stearin wax is stronger and less likely to break when twisted. Soy wax is a natural alternative, but it requires more precise temperatures. Test small amounts first.
- How can I stop my twisted candle from falling apart when it burns?
- Warm the wax strands evenly and thoroughly before twisting them so they bond firmly together. Allow the finished candle to cool and harden completely. Use a sturdy, medium-thickness wick that allows the wax to melt evenly.
- Can I make twisted candles with children?
- Yes, but only under constant adult supervision. Only an adult should melt and pour the hot wax. Children can safely twist the cooled, pliable strands or choose the colours. Always keep a glow plug wrench ready for other projects.
- What tools do I need to make twisted candles?
- You need a pot for melting the wax in a water bath, a melting container, a thermometer, wicks, a stable work surface and your hands for shaping. For precise work, ratcheting tools may not help directly, but they can improve your feel for materials and twisting movements.
- How should I store homemade twisted candles?
- Store the candles in a cool, dry place away from direct sunlight. Lay them flat or stand them securely on a shelf to prevent deformation. A shelf with a drawer is ideal for storing craft supplies and finished pieces.
You may also be interested in
- Make your own wax crayons: Creative crafts for children
- Make Easter lanterns: Creative DIY ideas
- Make a macramé lantern
- Upcycle leftover candles: Sustainable DIY ideas for your home
- Build your own Advent candle holder: Creative ideas for the festive season
- Make your own DIY Christmas decorations: Creative ideas for your home