
In brief: Choose standard plasterboard (GKB) for walls and ceilings in dry rooms. For bathrooms and kitchens, use impregnated green boards (GKBi). Fire-resistant boards (GKF) are required in areas with fire protection requirements. Soundproofing boards reduce noise, while hard plasterboards are ideal for heavily used areas and help ensure long-lasting results.
Plasterboard is at the heart of modern drylining. It enables you to create spaces, build walls or lower ceilings quickly and flexibly. However, not all boards are the same. Choosing the wrong type can lead to moisture damage, inadequate fire protection or poor sound insulation. This guide explains which plasterboard you need for each project and how to choose the right materials for a long-lasting result.
Contents
- What is plasterboard and why is it so popular?
- Standard plasterboard (GKB): The all-rounder for interior work
- Green boards for wet rooms: What do you need to consider?
- How does plasterboard improve fire protection?
- Specialist boards for specific requirements
- Working with and installing plasterboard: Practical tips
What is plasterboard and why is it so popular?
Plasterboard, often also referred to as a Rigips board, consists of a gypsum core covered on both sides with strong specialist paperboard. This simple construction gives it an impressive combination of strength and low weight. It replaces wet construction methods such as bricklaying and plastering, significantly speeding up the building process and eliminating the need for long drying times.
Drylining boards are popular because of their versatility. They are easy to cut, install and fill, creating a perfectly smooth surface for paint, wallpaper or tiles. Whether you want to build a new wall in the basement, convert an attic or lower a ceiling for recessed spotlights, plasterboard is often the most efficient solution.
Gypsum is a natural product. Gypsum-based building materials are recommended from a building-biology perspective because they are pH-neutral, odourless, emission-free and vapour-permeable. They naturally regulate humidity and therefore contribute to a comfortable indoor climate.
Standard plasterboard (GKB): The all-rounder for interior work
The grey standard board, also known as a construction board (GKB) or Type A, is the universal classic for most dry interior applications. It is cost-effective and suitable for all projects that have no special moisture or fire protection requirements.
Features and identification
You can identify standard boards by their light-grey paperboard and usually blue stamped lettering. The most common thicknesses are 9,5 mm and 12,5 mm. Thinner boards are well suited to curved structures or ceiling linings, while the 12,5-mm version is the standard choice for stable partition walls. The edges are often tapered (AK) to make joint filling easier.
Typical applications
Use GKB boards for non-load-bearing internal walls, lining systems to straighten walls or ceiling linings. They are the right choice for living rooms, bedrooms, hallways and offices. Avoid using them in rooms with consistently high humidity, such as bathrooms or utility rooms.
Additional advice
For greater stability and improved sound insulation, you can double-board walls. This involves installing two layers of plasterboard, offset from one another, on the supporting structure. This increases the wall's mass and significantly reduces sound transmission.
Green boards for wet rooms: What do you need to consider?
Rooms such as bathrooms and kitchens regularly experience high humidity. Standard plasterboard would swell and develop mould in these conditions. For these areas, you need special moisture-resistant boards, which can be identified by their characteristic green colour.
Impregnated plasterboard (GKBi) – Type H2
Green boards, technically known as GKBi (impregnated plasterboard) or Type H2, have a silicone-impregnated gypsum core. This impregnation considerably reduces water absorption and makes the board resistant to moisture. The green paperboard indicates this special property and makes identification on site easier.
Applications: Bathrooms, kitchens and basements
Use GKBi boards for walls and ceilings in domestic bathrooms, kitchens, cloakrooms and utility rooms. They are often also the better choice for unheated basements. If you are planning to install plumbing + irrigation systems, these boards provide the basis for long-lasting walls in the surrounding area.
Important note
Impregnated plasterboard is moisture-resistant but not waterproof. In areas exposed to direct water, such as a shower, you must additionally seal the boards with a liquid bonded waterproofing system before tiling. This prevents water from penetrating the supporting structure.
How does plasterboard improve fire protection?
Fire protection is a key issue in construction. Plasterboard makes a valuable contribution because its gypsum core contains chemically bound water of crystallisation. In the event of a fire, this water is released as steam, cooling the structure and slowing the spread of fire. Special fire-resistant boards are available for higher requirements.
Fire-resistant boards (GKF) – Type F
Fire-resistant boards (GKF) are identified by a reddish stamp or reddish paperboard. Their gypsum core is additionally reinforced with glass fibres. These fibres hold the core together for longer in a fire, even after the water has evaporated, thereby maintaining the stability of the structure for a defined period. They are classified into fire-resistance ratings such as F30 (fire-retardant) or F90 (fire-resistant).
Where are fire-resistant boards required?
The use of GKF boards is often required by building regulations. Typical applications include load-bearing walls and columns, fire walls, escape routes in public buildings, boiler rooms and attic conversions. They are also essential when cladding steel beams to preserve their load-bearing capacity in the event of a fire.
Expert tip
Combine fire-resistant boards with non-combustible mineral wool insulation (melting point > 1000 °C) in the stud wall. This combination not only improves fire protection but also significantly optimises the wall's sound insulation.
Specialist boards for specific requirements
In addition to the three main types, there are a number of specialist boards designed for specific challenges. These boards often combine several properties or are designed to withstand extreme loads.
Soundproofing boards for greater peace and quiet
Special soundproofing boards are available for effective sound insulation between rooms. They feature an especially dense and flexible gypsum core that absorbs sound waves better than standard boards. They are ideal for partition walls between bedrooms and living rooms, home offices or apartments in multi-unit buildings.
Durable hard gypsum boards
In high-traffic areas such as hallways, schools or public buildings, walls are often exposed to impacts and mechanical stress. Hard gypsum boards have an extremely compact, fibre-reinforced surface. They are significantly more robust and impact-resistant than conventional GKB boards and can withstand heavier use.
Insulated plasterboard composite panels
These boards are factory-laminated with an insulation layer made of polystyrene (EPS) or mineral wool. They are ideal for insulating external walls from the inside. Installation takes place in a single step, saving time and effort while making the energy-efficient renovation of older buildings easier.
Choosing the right board is the first and most important step. Using a moisture-resistant board in the living room is unnecessarily expensive, while using a standard board in the bathroom is a serious mistake.
Working with and installing plasterboard: Practical tips
Correct installation is just as important as choosing the right board. With the right tools and technique, you can achieve professional results.
The right tools are essential
To cut the boards, all you need is a sharp utility knife and a guide rail or long ruler. Score the paper surface on one side and snap the board over a straight edge. Then cut through the paper on the back. For cut-outs, such as those for sockets, use a jigsaw or a special plasterboard saw. Powerful power tools will help you attach the boards to the supporting framework.
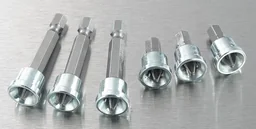
A cordless screwdriver with a depth stop is indispensable for this job. It ensures that the screw heads are driven slightly into the paper without breaking through the gypsum layer. A special ensures that every screw sits perfectly and creates a smooth surface for subsequent filling.
Filling and sanding for a perfect surface
After installation comes the most important step for a flawless finish: filling. Fill all screw holes and joints between the boards with joint filler. Embed a fibreglass or paper reinforcing tape into the joints to prevent cracking. After the first coat has dried, apply a second, finer coat of filler. Then sand the dried surface smooth until no transitions are visible.
Choosing the right plasterboard lays the foundation for the success of your building project. By considering the specific requirements of each room – from moisture exposure to fire protection – you can create durable, safe and functional walls and ceilings. Careful planning and clean workmanship will ensure a result you can enjoy for many years.
Frequently Asked Questions
- Can I use standard plasterboard in the bathroom?
- No, for damp areas such as bathrooms, you should use only impregnated plasterboard (GKBi), identifiable by its green color. Standard boards (GKB) swell when exposed to moisture and can develop mold. The impregnation of GKBi boards protects the gypsum core and ensures long-lasting performance in damp environments.
- What does the F30 rating on fire-resistant boards mean?
- The F30 designation indicates a fire-resistance period of 30 minutes. A wall or ceiling constructed with F30 boards will withstand a fire for at least 30 minutes without losing its load-bearing or room-enclosing function. The higher the number (e.g. F60, F90), the longer the fire protection lasts.
- How thick should plasterboard be for a partition wall?
- For a simple, non-load-bearing partition wall, boards with a thickness of 12,5 mm are generally used. With double boarding, which provides better sound and fire protection, two layers of 12,5 mm are installed on each side. Thinner boards (9,5 mm) are more suitable for suspended ceilings.
- Do I need to fill the joints between plasterboard sheets?
- Yes, filling the joints between the boards and the screw heads is essential. This creates a smooth, continuous surface for painting or wallpapering and prevents cracking. Use joint filler and reinforcing tape to create strong, invisible transitions between the individual boards.
- What screw spacing should I use for plasterboard?
- When installing on walls, the recommended screw spacing is a maximum of 25 cm. On ceilings, the screws should be placed closer together, with a maximum spacing of 17 cm. Correct screw spacing provides the necessary stability and prevents the boards from sagging or coming loose later.
You may also be interested in
- How to glue plasterboard: A simple guide
- Plasterboard: The ultimate drywall guide
- Converting an attic with drywall: How to create new living space
- Drywall for DIYers: How do I build walls and design rooms?
- Drywall tools: Essentials for plasterboard work
- Building materials at a glance: Choosing the right option for your project