
In brief: You can propagate plants in the garden in three ways: sow seeds, take cuttings or divide vigorous perennials. Choose healthy parent plants, use clean tools and keep seeds and cuttings evenly moist. The right time depends on the plant species, shoot and season.
Growing new plants saves money, expands your choice of varieties and turns one vigorous parent plant into several new specimens. Depending on the species, you can use seeds, cuttings or divide the rootstock. With the right timing, clean tools and a little patience, you can successfully propagate plants in flower beds, greenhouses and on balconies.
When propagating plants, the technique is not the only important factor. The health of the parent plant, a suitable growing medium and controlled watering are crucial. The following gardening tips show you how to propagate plants and help young plants develop strongly until they are ready to plant out.
How can you propagate plants in the garden?
There are three basic ways to grow new plants. Generative propagation produces new plants from seeds. Vegetative propagation uses plant parts such as shoots, leaves, runners or roots. When dividing, you split an established perennial into several rooted sections.
Generative and vegetative propagation
Sowing is suitable for annual flowers, vegetables, herbs and many perennials. It produces genetically different offspring. This makes the method appealing if you want to try new combinations or need a larger number of young plants.
Cuttings are genetically identical to the parent plant. This allows you to preserve the flower colour, growth habit or fruit quality of a proven variety. Dividing plants is also a form of vegetative propagation. The sections already have roots and usually grow faster after planting than seedlings.
- Sow seeds: Suitable for many flowers, herbs, vegetables and perennials.
- Take cuttings: Ideal for geraniums, fuchsias, herbs, hydrangeas and many woody plants.
- Divide perennials: Recommended for vigorous, clump-forming plants with several new shoots.
- Use runners: Strawberries, houseleeks and certain ground cover plants produce rooted daughter plants naturally.
Start with plants that root reliably or germinate quickly. An overview of suitable garden and plant supplies helps you choose seed trays, pots and growing medium.
Healthy, vigorous parent plants are the foundation for successful cuttings. Only use shoots with no visible signs of disease or pest infestation.
Expert tip
Label every sowing and cutting immediately with the plant name and date. This will help you identify later which variety germinated quickly, when rooting began and which conditions worked particularly well.
When should you sow seeds?
The best time depends on the plant species and location. Start frost-sensitive flowers and vegetables under cover indoors from February or March. Hardy varieties such as calendula, poppies, spinach and lamb's lettuce can be sown directly in the bed, depending on the variety. Follow the instructions on the seed packet.
Which seeds are suitable for growing new plants?
Use fresh seeds from a reliable source. Check the use-by date, germination temperature and site requirements. Old seeds often germinate unevenly, especially if they have been stored somewhere warm or damp.
Some perennials and woody plants need a cold period before they germinate. You can mimic this stratification by storing them in the refrigerator under controlled conditions. Follow the requirements for the species, as not all seeds tolerate the same duration or moisture level.
You can find suitable seeds in the Seeds and seed mixtures category. For flower mixes, choose a sunny, open spot. Herbs and vegetables generally need a low-nutrient, loose seed-starting mix and, later, a bright location.
Step by step: sowing seeds
- Prepare the container: Use a clean seed tray or small pots with drainage holes. Clean old containers before use.
- Fill with growing medium: Use a loose seed-starting mix. Press the surface down lightly without compacting it.
- Moisten the soil: Water carefully before sowing. A fine stream of water prevents the seeds from being washed away.
- Distribute the seeds: Sow thinly. Seedlings that are too close together compete for light and are more likely to develop fungal problems.
- Cover correctly: As a rule of thumb, sowing depth should be about twice the seed's thickness. Light-germinating seeds remain on the surface and only need a thin layer of vermiculite.
- Label: Write the variety, date and sowing depth on a label.
- Keep moist: Cover the tray loosely with a transparent lid. Ventilate daily to prevent standing condensation from forming.
Place the seeds somewhere bright, but not directly behind a hot windowpane. Excessive temperatures lead to tall, weak seedlings. As soon as the first true leaves appear, prick the plants out carefully into individual pots.
Important note
Waterlogging can quickly cause seeds and young roots to rot. Use containers with drainage holes and water again only when the surface has dried slightly. Mould, a musty smell or glassy stems indicate too much moisture and too little air movement.
How does propagating plants from cuttings work?
Taking cuttings means cutting off a suitable plant shoot and encouraging it to form roots. This method saves time because the new growth already carries the characteristics of the parent plant. Many species develop strong young plants within a few weeks.
When is the right time to take cuttings?
Take softwood tip cuttings between May and July. The shoots are then fresh but already stable enough to root. Semi-ripe cuttings are often suitable in late summer. Take hardwood cuttings from woody shoots during the dormant period, when the plant has no leaves.
The right time depends on the species. Herbs such as mint and sage often root quickly. Rosemary and lavender need more warmth and a very free-draining growing medium. Hydrangeas, fuchsias, ivy, currants and many ornamental shrubs can also be propagated from cuttings.
Which shoots are suitable?
Choose a healthy, strong shoot without flower buds. If you are taking a classic tip cutting, it should be neither soft and watery nor completely woody. For many plants, a piece five to ten centimetres long with at least one leaf node is sufficient.
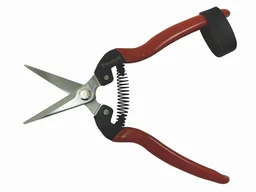
Use sharp, clean scissors for neat cuts. The "Wunderschere" is a practical tool for cutting jobs around the home and garden. You can find more suitable equipment among our garden tools.
How to take cuttings in seven steps
- Choose a shoot: Ideally, take the cutting in the morning from a well-watered parent plant.
- Cut below a node: Make a smooth cut without crushing the stem. This is where particularly many cells capable of division are found.
- Remove the lower leaves: Leave one or two pairs of leaves at the tip. If necessary, halve large leaves so the cutting loses less water.
- Prepare the growing medium: Mix seed-starting compost with sand or perlite. The growing medium must remain loose and drain away excess water.
- Plant the cutting: Insert the lower node into the soil. Gently firm the growing medium around the shoot.
- Maintain humidity: Place the pot somewhere bright and warm, protected from direct midday sun. A transparent cover keeps the humidity high.
- Ventilate regularly: Open the cover daily. Once the cutting produces new leaves or offers resistance when gently tugged, roots have usually developed.
Rooting powder can help with certain woody plants, but it is not necessary for every cutting. Follow the product instructions and use only a thin layer. Using too much rooting hormone will not encourage faster root development.
Rooting cuttings in a glass of water works for some herbs and houseplants. Wait until several strong roots have developed before potting them up. Water roots then need to adapt to soil, so carefully plant the young plant in moist growing medium and keep the humidity slightly higher at first.
The rooting medium should retain moisture while allowing enough air to reach the cut surface and young roots.
Which plants can be propagated by division?
When dividing plants, you split an established root ball into several sections. Each section needs healthy roots and at least one strong shoot. This method rejuvenates older perennials, limits their size and provides several new plants straight away.
Suitable perennials for division
Hostas, daylilies, asters, lady's mantle, cranesbill, yarrow and many grasses form dense clumps. These plants are usually divided in spring or autumn. Divide irises after flowering, when the rhizomes are clearly visible. Peonies grow slowly and should only be divided rarely and with great care.
Do not divide woody subshrubs such as lavender or rosemary. They are better propagated from cuttings. Plants with a deep taproot also often tolerate division poorly.
How to divide perennials correctly
- Water the perennial thoroughly the day before if the soil is dry.
- Lift the root ball with a spade. Dig far enough away from the outer foliage.
- Shake off loose soil and inspect the roots and shoots.
- Divide the root ball by hand, with a sharp knife or using two spades. Each section needs several roots and a shoot.
- Remove damaged or mushy roots with a clean cut.
- Replant the sections immediately at the same depth. Firm the soil and water thoroughly.
After division, a partially shaded location protects the plants from severe moisture stress caused by evaporation. Cut back damaged leaves, but do not remove more foliage than necessary. The plant needs its remaining leaves to develop new roots and shoots.
Additional advice
Do not divide perennials during periods of extreme heat or immediately before a frost. A cloudy, windless day with moist soil reduces stress. Freshly divided plants are particularly easy to monitor in pots and protect from slugs.
How do you care for young plants after propagation?
After propagation, proper care determines how the plants continue to grow. Young plants initially have only a small root system and are sensitive to drying out, waterlogging and strong sunlight. Check the pots every day without constantly touching the plants.
The first four weeks
- Water: Keep the growing medium evenly moist. Water slowly around the edge of the pot or from below so the young shoots remain stable.
- Light: Place the plants in a bright spot. Direct midday sun behind glass can scorch the leaves and heat up the growing medium considerably.
- Air: Ventilate covers every day. Gentle air movement strengthens the shoots and reduces the risk of fungal diseases.
- Nutrients: Wait to fertilize until the plant has rooted well and is visibly continuing to grow. After that, a weak dosage is sufficient.
- Check: Remove wilted leaves, dead shoots and affected plant parts immediately.
For larger plantings, plan for a reliable water supply. The garden irrigation category offers suitable solutions for flower beds, greenhouses and balconies. Later, fertilize young plants sparingly with a suitable plant fertilizer.
Recognizing common problems
Long, thin shoots usually indicate insufficient light. Move the plants to a brighter spot without exposing them to full sun straight away. Yellow leaves and permanently wet growing medium indicate too much water or inadequate drainage.
Wilted cuttings are not necessarily lost. First check the moisture level and temperature. If the stem is soft or dark at the base, rot has developed. Remove the affected part and place the healthy remainder in fresh, slightly moist growing medium.
Hardening off and planting out young plants
Gradually acclimatize home-grown plants to outdoor conditions. Start by placing them in a sheltered spot outdoors for one to two hours. Extend the time over about a week and slowly increase the intensity of sunlight.
Choose an overcast day or plant in the evening. Loosen the soil, water the planting hole and set the young plant at the same depth as before. Firm the soil around it and protect sensitive species with horticultural fleece during the first few nights.
Whether you sow seeds, take cuttings or divide plants, a healthy parent plant, clean tools and consistent care provide the foundation for success. This makes propagating plants manageable and gives you new plants for your garden, balcony and patio every year.
Frequently Asked Questions
- Which plants are especially easy to propagate from cuttings?
- Mint, sage, rosemary, geraniums, fuchsias, ivy, hydrangeas and currants root particularly easily. Take healthy, non-flowering shoots, remove the lower leaves and place them in moist seed-starting mix. The variety, time of year, temperature and humidity all affect how quickly new roots form.
- When is the best time to take cuttings?
- For many ornamental plants and herbs, take cuttings in late spring or summer when the shoots are soft to semi-ripe. Semi-hardwood cuttings are often suitable for late summer. Hardwood cuttings work well for many woody plants in winter. Always check the requirements of the particular plant species.
- How deep should I sow seeds?
- Most seeds should be sown no deeper than their own thickness. Fine light-germinating seeds remain on the surface of the growing medium and need only a thin covering of vermiculite. Press larger seeds gently into moist soil. The seed packet provides the exact sowing depth, temperature and germination time.
- Can I propagate perennials by division?
- Yes. Divide perennials in spring or fall when the soil is frost-free and sufficiently moist. Dig up the root ball, separate it into strong sections and replant them immediately. Each division needs healthy roots and at least one well-developed shoot.
- How do I care for young plants after propagation?
- Young plants need consistent moisture, bright light without strong midday sun and air movement. Ventilate propagation containers daily, remove wilted leaves and use a weak fertilizer only after roots have formed. Before planting out, acclimatize the plants to wind, sun and cooler nights over several days.
You may also be interested in
- Propagating Houseplants: Easy Methods for Home
- Taking Cuttings: An Easy Guide to Growing More Plants
- Propagating Rosemary: How to Grow It Easily in Your Own Garden
- Propagating Monstera: How to Do It Easily at Home
- Propagating Succulents: An Easy Step-by-Step Guide with Pictures
- Propagating Lawns: How to Get Your Grass Growing Again