
In brief: You can improve the look of exposed aggregate concrete pavers by painting them, resurfacing them with concrete, covering them with tile or wood, or adding greenery between the joints or patterns made with stencils. Thorough cleaning and preparation are the foundation of every project. For long-lasting results, choose paints and materials designed for outdoor use.
Update Exposed Aggregate Concrete: DIY Patio Ideas
You do not have to replace weathered, gray exposed aggregate concrete pavers. With a little creativity and DIY know-how, you can turn the area into an eye-catching feature. This guide covers practical ideas for your patio design and updating garden paths.
Why is it worth updating exposed aggregate concrete pavers?
Replacing all the pavers is expensive and time-consuming. You have to dispose of the old material, build a new base and install the new surface. Updating what you have saves money, time and resources. You can create a custom outdoor space that suits your home and garden.
Most methods are also manageable for DIYers with limited experience. You do not need specialized equipment, and you can finish the project in a weekend. Give your patio or garden paths a whole new look.
The look of concrete surfaces has a big impact on how you enjoy your garden. An updated patio becomes an extension of your living room.
How do I prepare exposed aggregate concrete pavers?
Preparation is the most important step for lasting results. Any method can fail if the base is dirty or unstable. Start with a thorough inspection. Tap the pavers. Remove any loose or badly sunken ones and compact the bedding again.
Clean the surface thoroughly. Remove moss, algae and dirt with a pressure washer. For stubborn growth, use a specialized cleaner from a home improvement store. In our range of garden tools, you will find practical helpers for heavy-duty cleaning.
Important
Wear sturdy shoes and safety glasses when cleaning with a pressure washer. The powerful spray can loosen and propel small stones. Never work on a bare, wet surface—it's slippery!
Next, scrape out the joints. Remove all loose remnants of jointing mortar. This helps prevent stress beneath new coverings later on. In dry weather, let the entire area dry completely for at least 48 hours. Moisture beneath a new coating can cause it to peel.
What methods can I use to improve the look?
You can choose between cosmetic updates and installing a new covering. The right choice depends on the condition of your pavers, your budget and the look you want.
Method 1: Paint or stain exposed aggregate concrete pavers
Painting is the quickest option. It covers the old look with a new color. Use only specialty concrete paint, tile paint or high-quality acrylic masonry paint. These products adhere to mineral surfaces and stand up to the weather.
Apply a suitable bonding primer before painting. It improves adhesion and reduces paint use. Roll on the paint evenly, working from one corner to the other. For a natural, matte look, use a concrete stain. It penetrates the surface and lets the texture show through.
Pro tip
Always test the paint on a hidden paver or sample first. This lets you check the final color and coverage. Mix all the paint cans you need together to avoid color differences.
Method 2: Resurface with a thin layer of concrete
If the surface is very uneven or damaged, skip the paint. A thin layer of concrete resurfacer or fine render smooths the area. This method also works well if you want a completely new color and texture. Specialty systems contain synthetic resins for strong adhesion and flexibility.
Mix the material according to the manufacturer's instructions. Spread it evenly with a trowel. The layer is usually only a few millimeters thick. You can smooth it flat or add texture with a textured roller. Follow the recommended curing time and protect the fresh layer from rain and sun.
Method 3: Cover with tile panels or mosaic
Give your patio a Mediterranean look. Attach frost-resistant outdoor tile or mosaic panels directly to the cleaned and primed pavers. Use a flexible tile adhesive made for outdoor use, and fill the joints with suitable grout.
Plan the layout in advance. Cut the tiles accurately with a wet saw. This method takes more skill, but the result is high-quality and durable. It adds very little to the finished height.
Method 4: Update the look with wood or WPC
Like the look of wood? Install wood or WPC decking over the pavers on a substructure. The old pavers provide a stable, level base. The substructure, made from aluminum or timber joists, must slope about 2% away from the house.
This creates a completely new surface. Make sure there is proper ventilation beneath the deck boards. This method is ideal when the old pavers are stable but beyond saving visually. Find suitable materials in our garden equipment category.
Combining an old, solid concrete base with a new, modern wood or stone surface is often the most durable solution. It brings together the benefits of both materials.
Method 5: Create designs with stencils and patterns
Use the bare concrete surface as a canvas. After priming, paint patterns with stencils. Geometric shapes, stepping-stone effects and nature-inspired designs are all options. Use specialty opaque concrete markers or apply paint with a brush.
Or give the joints a new look. Fill the cleaned joints with colored jointing mortar or gravel. You can also add specialty jointing gravel in a contrasting color. For a touch of green, sow hardy plants such as Irish moss or pennywort between the pavers. Find the accessories you need in the Garden + Plant Accessories section.
How do I update garden paths with renovated pavers?
Garden paths follow similar principles. They often get less wear, but their surface is narrower, making them especially suitable for creative accents. Use individual pavers in a contrasting color to mark out a path, or create a contrasting border along its edges.
Paths give you more freedom to experiment with materials. Leave wider joints between updated exposed aggregate pavers and plant them. This gives the path a more natural look. A section of path covered with
creates a surprising green carpet effect.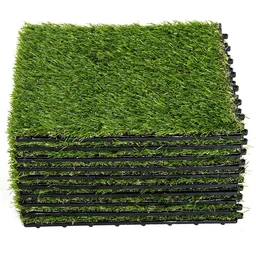
Extra tip
Always plan a slight slope for paths so rainwater can drain away. Around 2-3% is enough. Check the slope with a level before you start. Standing water encourages algae growth and frost damage.
For a consistent look, update your patio and adjoining paths at the same time. Use the same color family or the same method to create a harmonious look throughout your garden.
What tools and materials do I need?
You’ll need a manageable set of basic tools. For cleaning and preparation, gather a pressure washer, joint scraper, broom, scrub brush and, if needed, a concrete cleaner. For painting or resurfacing with concrete, you’ll need a roller, paintbrush, paint tray, finishing trowel, mixing paddle and a suitable bucket.
For precise work, such as laying tiles or painting with stencils, you’ll also need a level, notched trowel, wet saw, tape measure and pencil. The
, our “Wunderschere,” is a versatile tool for cutting a variety of films and thin materials.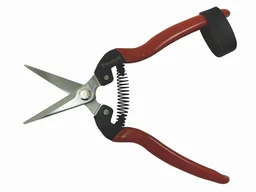
Protect yourself and your surroundings. Work gloves, safety glasses, knee pads and a respirator for mixing dusty materials are essential. Cover nearby surfaces and plants with protective sheeting. Our patio covers are ideal for storing materials or covering furniture.
How do I care for renovated slabs over time?
Care depends on the finish you choose. Sweep painted or resurfaced areas regularly and occasionally clean them with mild soapy water. Avoid harsh cleaners and wire brushes, which can scratch the surface.
Tiled and wooden surfaces need their own care. You may need to renew the grout after several years. Wood should be oiled or stained regularly. Protect your furniture and renovated surface during the rainy season. A
, our patio heater cover, shows how easy it can be to protect outdoor features.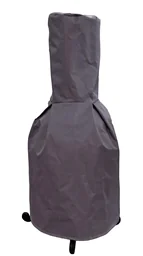
Check the joints for weeds once a year and remove them early. Painted surfaces may need a fresh coat after several years. A well-prepared surface makes the job easier.
With the right methods and thorough preparation, you can give old exposed aggregate concrete slabs a whole new look. Whether you’re creating a modern patio or a natural-looking garden path, you can bring your ideas to life.
Frequently asked questions
- Can I paint directly over exposed aggregate concrete slabs?
- Yes, this is one of the easiest ways to update them. Use paint made for concrete or a bonding primer for masonry surfaces. First, clean the slabs thoroughly to remove moss, algae and dirt. Primer helps the paint adhere and last longer.
- What paint lasts longest on exposed aggregate concrete slabs?
- Concrete and masonry paint, tile paint or high-quality acrylic masonry paint are good choices. Look for weather resistance, abrasion resistance and strong adhesion to masonry. Avoid standard interior paint.
- How much does it cost to renovate exposed aggregate concrete slabs?
- Costs vary considerably. Painting is the most affordable option, at around 5-15€ per m² for paint and primer. Thin-coat overlays or tile panels cost around 20-50€/m². A complete concrete resurfacing is the most labor-intensive and expensive option, at 30-80€/m².
- How do I clean exposed aggregate concrete slabs before renovating them?
- Start by removing loose dirt, then use a pressure washer with a suitable attachment. A specialized algae and moss remover can help with heavy growth. Use a joint scraper to clean the joints. Let the surface dry completely before you continue.
- Can I lay new slabs directly over old exposed aggregate concrete slabs?
- It’s possible, but the existing surface must be stable, strong enough to support the new slabs and level. Check for settling. You’ll need a bed of sand or mortar. Keep the added height in mind, as it may create a step at doorways.
You might also be interested in
- Patio design: modern and Mediterranean ideas for your garden
- Upcycling for your home and garden: sustainable DIY projects
- How to choose the right pavers for garden paths and driveways
- How to lay patio slabs: a step-by-step guide to a durable surface
- How to lay stone strips: step-by-step instructions for patios and paths
- Cutting pavers: how to get a clean cut for garden paths