
In brief: For exterior wood protection, a wood stain is usually the best choice: it penetrates the surface, stays flexible and keeps the grain visible. Wood paint, on the other hand, forms an opaque, hard protective layer against moisture and dirt. Use paint for colourful, smooth surfaces and stain for natural-looking components that continue to move.
Direct answer: For exterior wood protection, a wood stain is usually the best choice: it penetrates the surface, stays flexible and keeps the grain visible. Wood paint, on the other hand, forms an opaque, hard protective layer against moisture and dirt. Use paint for colourful, smooth surfaces and stain for natural-looking components that continue to move.
Wood changes with temperature and humidity. It absorbs water, releases it again, expands and contracts. The right coating therefore protects against more than rain: it must also suit the movement of the component, the type of wood and the maintenance required later.
Wood stain or paint: What really protects wood?
Stain and paint serve different purposes. Wood stain penetrates partially into the surface and, depending on the product, forms a thin, flexible film. The grain remains visible. Paint sits on the wood as a sealed layer and can completely change its colour, sheen and surface.
How does wood stain work?
Pigmented exterior stain protects against UV radiation and reduces water absorption. When applied correctly, it usually does not peel off in large flakes but gradually loses its effectiveness. This makes renovation easier: clean the surface, sand it lightly and apply a new coat.
Stain is suitable for fences, pergolas, carports, garden sheds and exposed wooden beams. Thin-film stains are suitable for components that can retain their dimensions. For windows, doors or highly exposed surfaces, you need a product that the manufacturer expressly approves for this level of exposure.
When is wood paint the better choice?
Paint creates a sealed, even surface. It is suitable for colourful garden furniture, doors and components where you do not need to see the wood grain. The surface is easy to clean and, with several coats, can be significantly more resistant to abrasion.
The sealed paint layer leaves little room for errors during preparation. If water penetrates through a damaged area, it can remain trapped beneath the film. This causes blisters, cracks and flaking. Therefore, use a flexible exterior paint and inspect the surface regularly.
| Property | Wood stain | Wood paint |
|---|---|---|
| Appearance | Grain remains visible | Opaque, even colour |
| Layer | Thin and usually flexible | Sealed and harder |
| Renovation | Light sanding is often sufficient | Damaged layers must be checked thoroughly |
| Suitable for | Fences, beams, garden sheds | Doors, furniture, smooth components |
“Wood preservatives are used to protect wood from wood-destroying or wood-discolouring organisms.”
This definition highlights the difference between decorative weather protection and genuine protection against fungi or insects. A coloured stain does not automatically prevent every type of biological damage. Check the label and approval if a component is at structural risk.
Why does exterior wood protection need a different strategy?
Exterior wood protection has to withstand several types of exposure at the same time. Rain brings moisture, sunlight breaks down binders and colour pigments, and wind carries in dirt. Horizontal surfaces dry more slowly than vertical ones and usually require more attention.
Which sides of a building put the most stress on wood?
South- and west-facing sides receive a great deal of UV radiation and driving rain. Although wood stays drier beneath roof overhangs, moisture can collect around joints, end grain and horizontal edges. Therefore, inspect not only the visible front, but also undersides, gaps and the bases of posts.
End grain absorbs water particularly quickly. A suitable edge sealer and several careful coats can help here. Allow water to run off instead of letting it collect on an edge. Good construction extends the service life of every coating.
What moisture level should wood have before painting?
Only paint dry, clean wood. The permitted moisture content depends on the type of wood and the product, but for exterior components it is often around 12 to 18 percent. The technical data sheet and the information on the container are decisive.
Plan the painting for several dry days. Morning dew, rain and high humidity extend the drying time. Direct midday sun, on the other hand, can make the surface dry too quickly. Work in the shade once the surface is dry and frost-free.
Pro tip
Test the absorbency with a drop of water. If it soaks in quickly, the wood can still absorb coating. If it remains as a bead, you need to sand the surface or remove an old, water-repellent layer.
The construction also determines which coating is suitable. Wood in contact with the ground, poorly ventilated joints and permanently damp areas need a different solution from a freestanding garden chair. Eliminate the cause of the moisture before applying a new coat.
How do you prepare wood for painting?
When painting wood, preparation determines adhesion and durability. New boards may be rough-sawn, resinous or highly absorbent. Older surfaces often contain loose paint, grease, algae or weathered fibres.
- Check for damage: Replace soft, rotten or badly cracked parts. A coating will not repair rotten wood.
- Clean: Remove dust, algae, moss and grease. Then allow the wood to dry completely.
- Assess old layers: Scrape off loose paint and check adhesion. Chalking surfaces need thorough cleaning and a suitable new coating system.
- Sand: Smooth rough fibres and lightly round off sharp edges. If a coating is already present, sand until matt rather than only treating isolated spots.
- Remove dust: Vacuum or brush the surface carefully. Dust prevents the new coat from adhering evenly.
How do you sand wood for stain and paint?
For stain, medium-grit sanding is often sufficient on bare wood to smooth the fibres without completely sealing the surface. For paint, sand more finely and evenly. Wood fibres rise after the first coat. Intermediate sanding with fine-grit paper produces a smooth surface.
When cutting or repairing damaged boards, a
be used for wood and metalwork. Make clean cuts, seal fresh cut surfaces and remove all sawdust before priming or staining.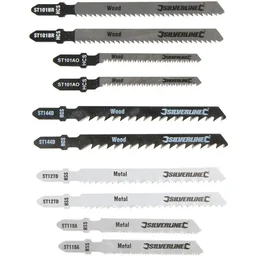
When do you need a primer?
Prime highly absorbent, unevenly coloured or resinous wood when the system calls for it. A primer can improve adhesion, block stains and reduce the amount of topcoat required. It must be chemically and technically compatible with the subsequent paint or stain.
Important note
Do not dry-sand old coatings if you do not know whether they contain hazardous substances. Older paints may contain problematic pigments or wood preservatives. Keep dust to a minimum, wear suitable respiratory and eye protection, and dispose of sanding dust according to local regulations.
Take particular care with edges, drilled holes and cut surfaces. Water penetrates more quickly there than across the main surface. Allow the wood to dry completely between cleaning, priming and applying the topcoat.
How do you apply stain and paint correctly?
Stir the coating slowly and thoroughly. Do not shake containers unnecessarily, as this can create air bubbles. Use a brush, roller or spray gun only if the product is suitable for that tool.
How can you apply stain evenly?
Work in the direction of the grain and divide large surfaces into manageable sections. Start with edges, joints and end grain before coating the main surface. Spread the stain thinly and evenly. Lap marks occur when one area has already started to dry while you continue working next to it.
With transparent or semi-transparent stains, each additional coat affects the colour. Test the result on a leftover piece or an inconspicuous area. Different types of wood absorb the same stain to different degrees.
How can you apply paint without leaving streaks?
Apply paint in thin coats. Avoid reworking areas that have already started to dry. First brush across the grain, then spread the material along the grain and finish with a light brush stroke without applying pressure.
Follow the drying time specified by the manufacturer. Sanding between coats too soon can disturb the still-soft layer. Remove all sanding dust before applying the next coat. Two or three thin coats usually produce a more even finish than one thick coat.
Which tool is right for the surface?
A high-quality brush is suitable for profiles, corners and edges. Large, smooth surfaces can be coated more evenly with a suitable paint roller. With a bookcase such as
or other small indoor projects, clean work on the edges is particularly important.
The wooden sleepers of the flexible track
show why small wooden parts require special care: Apply a thin coat to edges and transitions, keep moving joints free and use only products suitable for toys. Exterior paint is not automatically suitable for indoor items.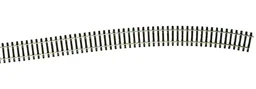
Additional advice
Label each container with the date, colour and intended use. This makes it easier to find the right product during your next renovation. When buying wood stain, consider whether it is for outdoor use, the type of wood, the desired coat thickness and the renovation interval—not just the colour.
Cover adjacent surfaces with a suitable protective sheet for wood or a protective tarpaulin. Remove paint splashes immediately while they are still wet.
Which wood protection is right for fences, garden furniture and wooden houses?
Choose the coating according to exposure, appearance and maintenance requirements. A fence can be allowed to age visibly and is usually easy to maintain. A door must remain dimensionally stable and withstand frequent handling, cleaning and driving rain.
| Structure | Recommendation | What to look out for |
|---|---|---|
| Fence and privacy screen | Pigmented exterior stain | UV protection, end grain and post bases |
| Garden shed and pergola | Stain or opaque exterior paint | Weather-facing side, roof connections and regular inspections |
| Garden furniture | Exterior stain or suitable furniture paint | Abrasion, standing water and frequent maintenance |
| Exterior doors and windows | Dimensionally stable paint or stain system | Edges, joints and freedom of movement |
| Indoor shelving and wooden toys | Interior paint or suitable stain | Emission information, grip and abrasion resistance |
What is important for fences and privacy screens?
For a fence, an open-pore, pigmented stain is often the practical choice. It highlights the wood grain, can be renewed section by section and adapts to the movement of the boards. For an opaque colour, use a paint suitable for exterior use or an elastic paint system.
If you also cover stored boards, tools or garden furniture, protective covers shield them from rain and dirt. The cover must be well ventilated. A tightly fitting sheet can trap condensation and reduce the effectiveness of the wood protection.
Which coating is right for garden furniture?
Garden furniture is touched, moved and cleaned. A robust, easy-to-clean surface may be more important here than visible wood grain. With furniture made from teak, larch or other oily woods, check especially carefully whether the chosen product will adhere.
Do not leave furniture permanently on wet ground. Felt pads or spacers keep the underside dry. Covers should only be used on dry furniture and removed regularly for ventilation.
When should you choose an opaque colour?
Opaque paint or exterior paint conceals different shades and repaired areas. It is suitable if you want a clear colour contrast or a uniform garden look. The surface must be stable, dry and sound, as the opaque coating will make unevenness visible.
For work involving sanding dust, cleaning agents and coatings, you will find additional information in the Workplace Safety & Protection category. Gloves protect your skin, while safety goggles protect your eyes. Ventilate indoor areas during application and drying.
How long does the coating last and when should you renew it?
A coating does not last the same length of time according to a fixed schedule. Orientation, wood type, roof overhang, colour and coating thickness all affect the level of exposure. Inspect exterior wood at least in spring and autumn.
- Faded colour: The pigments are losing their UV protection.
- Water soaks in: The surface no longer repels moisture sufficiently.
- Cracks at the edges: Moisture can get under the coating.
- Flaking or blistering: Adhesion has been compromised, often due to moisture in the substrate.
- Rough fibres: The surface is weathered and needs to be prepared again.
How do you maintain stained wood?
Clean the surface with a soft brush and a mild, suitable cleaner. Allow it to dry, then check its absorbency, colour and adhesion. With light weathering, sanding lightly followed by a renovation coat is often sufficient.
Do not simply apply new stain to a dirty, greasy or green-discoloured surface. The coating will then adhere unevenly and fail to protect the affected areas. First remove the cause, such as persistent splash water or insufficient clearance from the ground.
How do you repair painted wood?
For minor damage, sand out the edges, clean the area and rebuild the coating to match the existing system. If large areas are peeling, it is usually worth removing all loose layers. New paint will only adhere as well as the sound substrate beneath it.
„Wood dust can cause cancer.“
This warning applies especially to dry sanding and working with wood. Use dust extraction, respiratory protection and safety goggles. Do not clear up sanding dust with compressed air, as this spreads it around the room.
By checking the coating regularly, you can repair minor damage before water penetrates the wood. Store brushes, rollers and opened containers in a dry, frost-free place. This makes the next maintenance job easier to plan and keeps the surface protected for longer.
Frequently Asked Questions
- Which is better for outdoor wood, stain or paint?
- For fences, carports and garden sheds, exterior stain is usually a good choice because it regulates moisture and accommodates the movement of the wood. Paint is suitable if you want an opaque colour and smooth surface. Outdoors, use only a product approved for exterior use and follow the recommended maintenance schedule.
- Can I paint over old stain?
- Only after checking the surface and preparing it thoroughly. Remove loose or chalking stain, clean the surface and sand it until matt. Test adhesion in an inconspicuous area. If the old coating remains water-repellent or is peeling, remove it completely and apply a primer suitable for the new paint.
- How often should I repaint wood outdoors?
- Inspect the coating at least once a year, especially on south- and west-facing sides and horizontal surfaces. Renew the stain as soon as the colour fades, water no longer beads up or cracks appear. With paint, touch up damaged areas immediately to prevent moisture from getting under the film.
- Do I need to prime wood before painting?
- A primer is not always necessary. It helps with raw, absorbent or unevenly coloured wood and improves adhesion. Outdoors, choose a primer that is compatible with the topcoat. For resinous woods or vulnerable structures, also follow the manufacturer's instructions.
- How can I prevent brush marks when painting wood?
- Sand finely between coats, remove all dust and work with suitable, high-quality tools. Apply thin, even coats in the direction of the grain. Avoid direct sunlight, wind and high humidity. Allow each coat to dry for as long as specified in the datasheet.
You may also be interested in
- Painting & staining wood: A guide to perfect surfaces
- Applying wood stain: Protection and care for outdoor wood
- Coatings at a glance: Choosing paints, varnishes and stains
- Boat varnish: Optimal wood protection for garden & outdoor use
- Using wood preservatives correctly: Types, differences and effective protection
- Painting wood: Avoid the 5 most common mistakes